FaceTime Like a Pro
Get our exclusive Ultimate FaceTime Guide 📚 — absolutely FREE when you sign up for our newsletter below.

FaceTime Like a Pro
Get our exclusive Ultimate FaceTime Guide 📚 — absolutely FREE when you sign up for our newsletter below.


Stop wasting time dragging window borders. The built-in Snap Layout feature in Windows 11 organizes your workspace in seconds.
For years, I treated manually resizing windows as an unavoidable part of multitasking on my PC. Every time working with multiple apps, I would drag one window to the side, resize another, and keep adjusting them until everything somehow fit on my screen. If you are also struggling with the same, here’s the good news. Windows 11 has solved this problem.
With Windows 11’s built-in Snap Layouts feature, you can now organize multiple windows into a clean workspace in just a few clicks or with a simple keyboard shortcut. After getting used to it, I feel that manually dragging and resizing windows is primitive.
In this guide, I will show you how to organize windows in Windows 11 using Snap Layout and share some quick tips to make multitasking easier.
Windows multitasking has always allowed basic window snapping. You could drag a window to the left or right edge of the screen and make it occupy half the display. That was useful, but Windows 11 takes the idea much further with Snap Layouts.
Instead of manually dragging and resizing every app window, Snap Layouts gives you predefined window arrangements. Depending on your screen size and resolution, you can divide your desktop into different sections and place apps exactly where you want them.
For example, you can create layouts with:
The best part is that Windows handles the sizing for you.
Microsoft has built Snap directly into Windows 11’s multitasking experience, and you can even customize features such as Snap Assist, Snap Groups, maximize-button layouts, and drag-to-snap behavior from the Multitasking settings. I think that’s what makes Snap Layouts so underrated.
There are several ways to use Snap Layouts, but I have two favorites.
The easiest way is almost suspiciously simple.
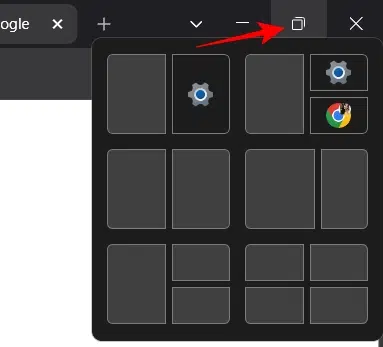
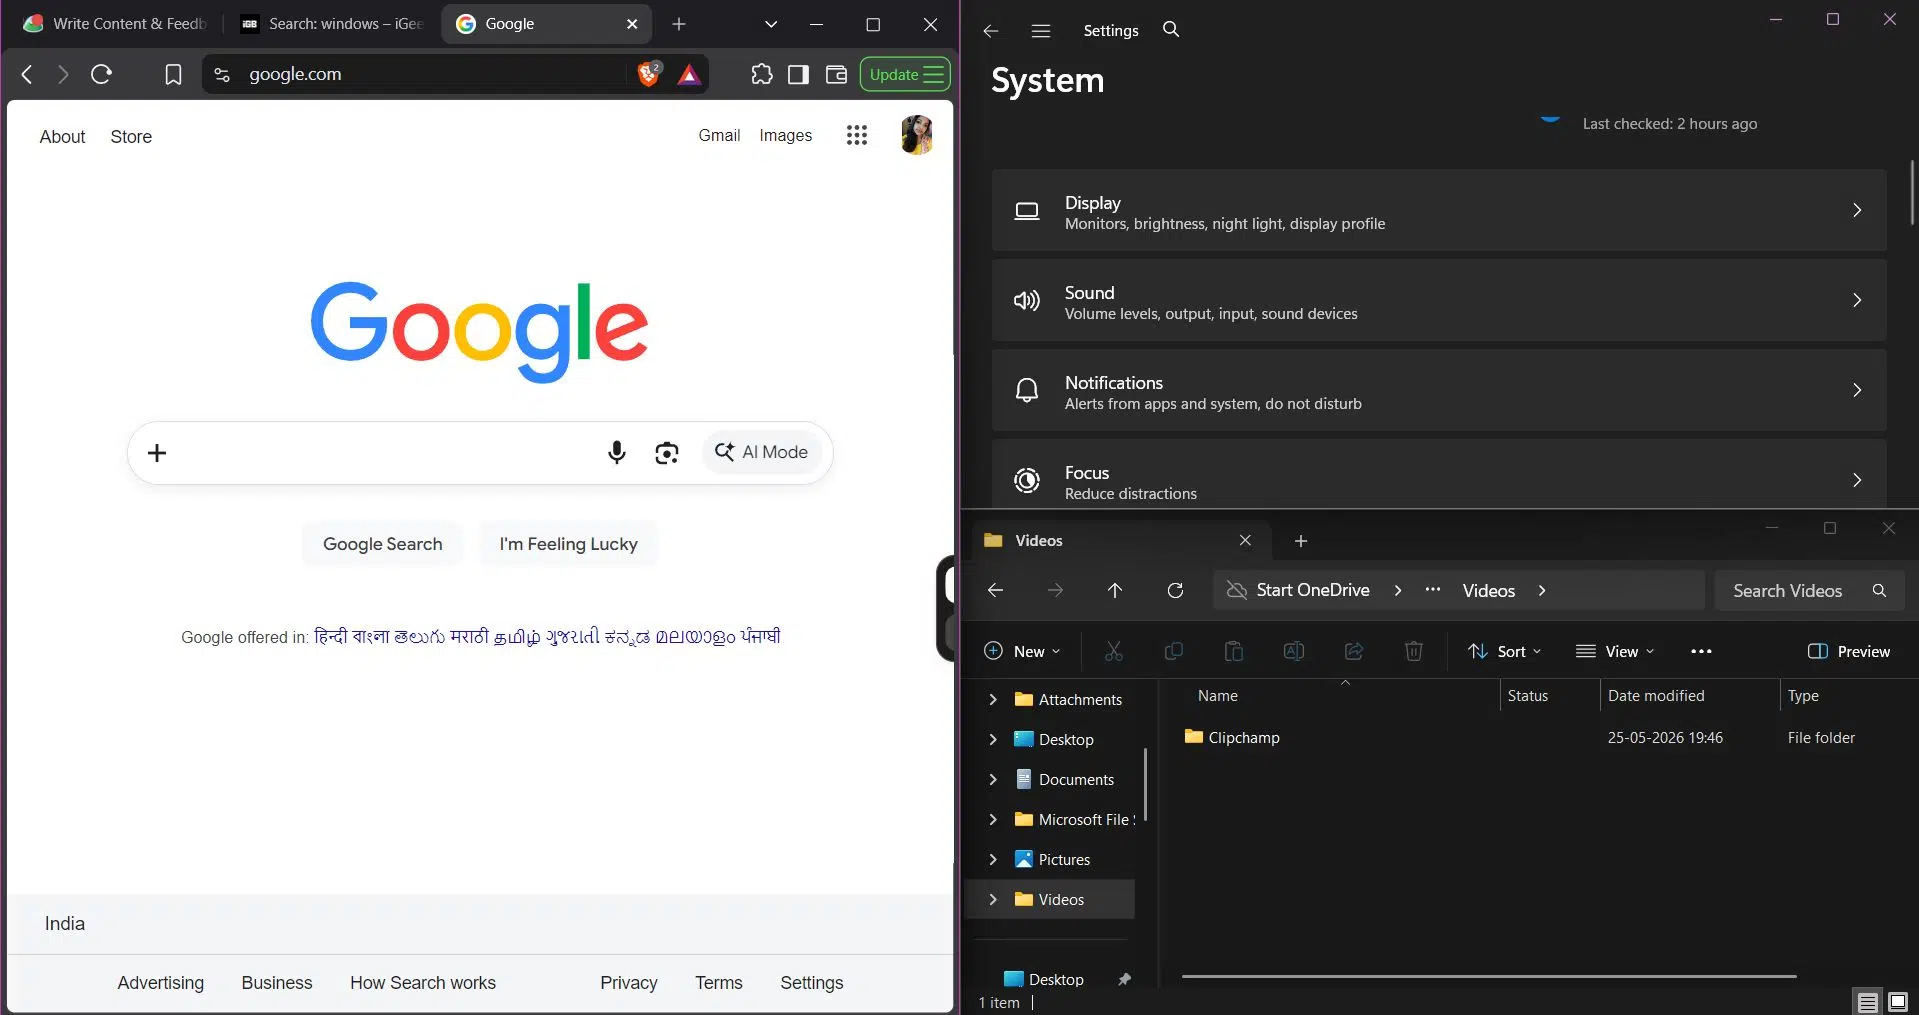
No dragging or trying to perfectly align two windows. You can also resize the snapped windows by selecting and dragging the dividing lines.
Once I discovered the keyboard shortcut, I started using Snap Layouts much more often.
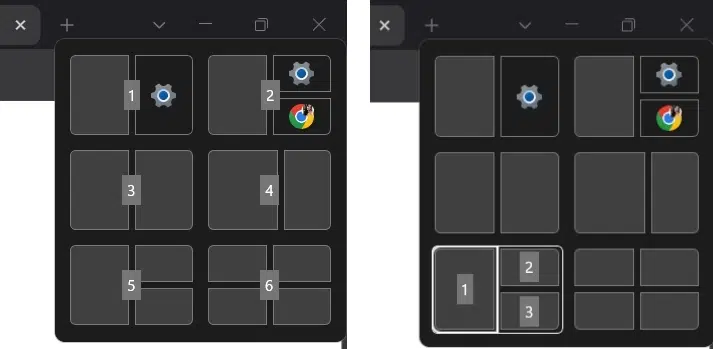
To supercharge my productivity on Windows 11, I use some keyboard shortcuts for app windows. They are even faster than Snap Layout organization when you already know where you want a window.
The most useful ones are:
You can combine these shortcuts to move windows into corners. For example: Windows + Right Arrow > Windows + Down Arrow. This places a compatible window in the bottom-right section of the screen.
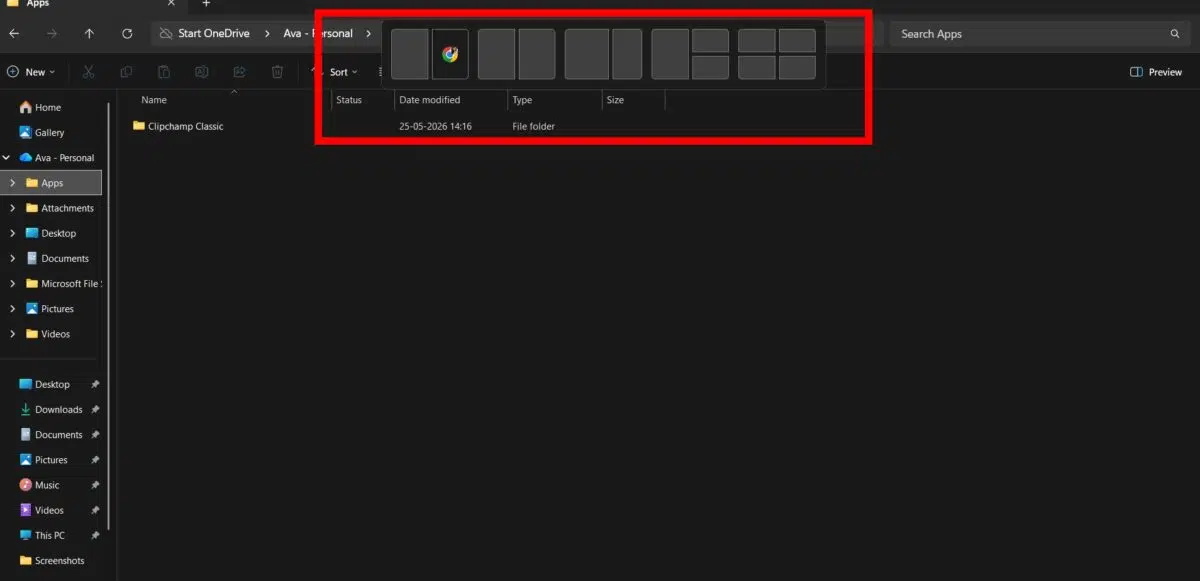
There’s another visual way to access Snap Layouts that I find particularly useful when I don’t want to remember a keyboard shortcut.
Simply click and hold a window by its title bar, then drag it to the top of the screen. Windows 11 will display the available Snap Layouts, allowing you to choose your preferred arrangement. You can then drag and drop the window into the exact position you want.
This method also works on touchscreen devices. Just place your finger on the window’s title bar and drag it toward the top of the screen. After the Snap Layout appears, move the window into the desired area to snap it.
It’s a simple option, but I think it’s especially useful for touchscreen laptops and tablets where keyboard shortcuts aren’t always convenient.
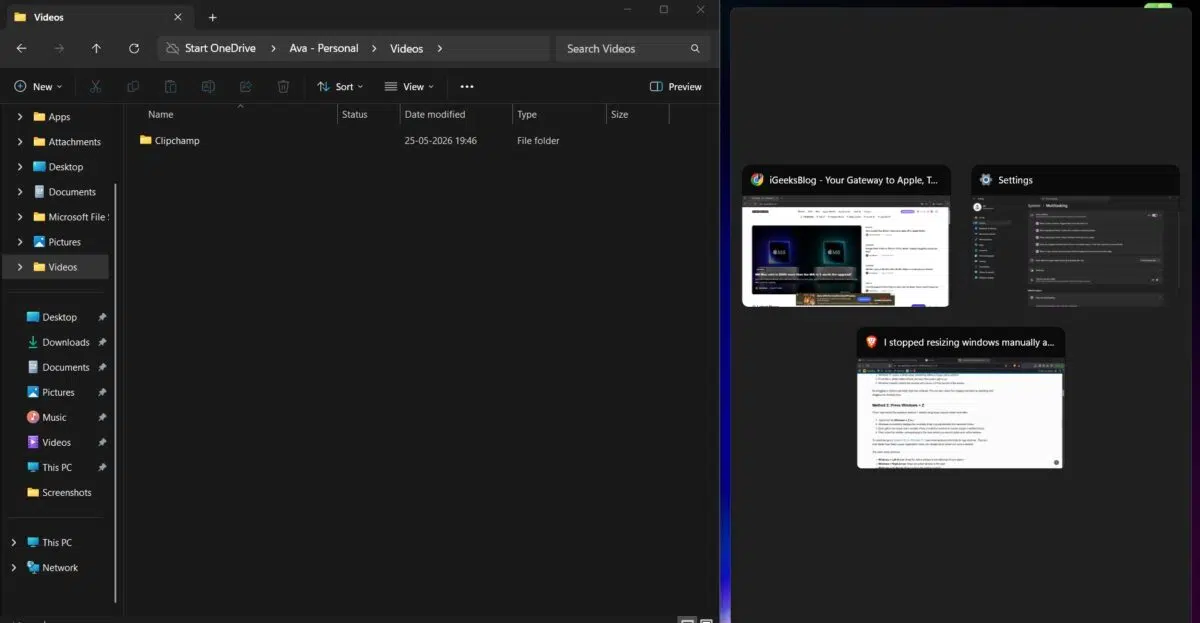
Snap Layouts alone would be convenient. But Snap Assist is what makes the whole experience feel genuinely intelligent.
Here’s what happens.
I snap my first app into a section of the screen. Instead of leaving the rest of the desktop empty and forcing me to manually arrange everything else, Windows shows thumbnails of my other open applications.
I can simply click one. Windows fills the next available section. Click another app to fill another section. Within a few seconds, my messy desktop becomes an organized workspace.
Snap Assist is designed to suggest other open windows after you’ve snapped one, making it easier to fill the remaining screen space without manually positioning and resizing every application one by one.
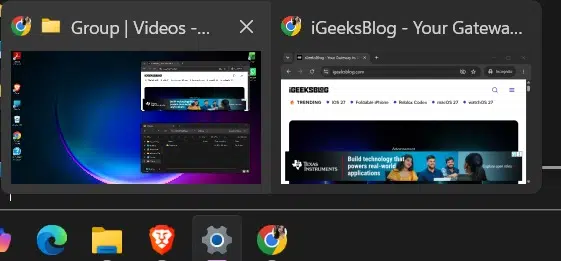
This is where Windows 11’s multitasking features became much more useful for me.
Imagine you’ve carefully arranged your workspace. Chrome is on the left; your mail inbox is on the right. Everything is perfectly organized. Then you open another application. Maybe you need to check a message on Slack or quickly open File Explorer. Normally, your carefully arranged workspace disappears behind everything else.
This is where Snap Groups come in.
Windows can remember apps that you’ve arranged together in a Snap Layout and treat them as a group. That means you can switch away from your workspace and later return to the group instead of manually rebuilding the entire layout.
Microsoft allows snapped window groups to appear when hovering over taskbar apps and through Task View (Windows Key + Tab) and Alt + Tab overlays, depending on your Snap configuration. You can switch between the Snap groups.
This is the point where I stopped thinking of Snap Layouts as a simple window-resizing feature. It’s really a lightweight workspace management tool.
To be clear, Windows hasn’t removed traditional snapping.
You can still:
And sometimes dragging is still convenient.
If my hands are already on the mouse and I want to quickly snap two windows together, dragging is perfectly fine. But I don’t think it’s the best method anymore.
Once you get used to Windows + Z and the arrow-key shortcuts, manually dragging windows starts feeling unnecessarily slow. Dragging requires precision, but keyboard shortcuts don’t.
After using Windows 11’s Snap feature more regularly, there are a few things I wish I had known sooner.
Snap Layouts aren’t identical on every computer. The layouts Windows offers can depend on your display size and resolution.
Larger displays generally give you more useful multitasking options because Windows has more screen space to work with.
This makes Snap Layouts particularly enjoyable on:
I feel that not everyone wants Windows constantly suggesting layouts. The feature works best when you configure it to fit your workflow.
To solve this issue, Windows 11 gives you granular control over how Snap behaves. You can keep Snap enabled while disabling individual behaviors that you find distracting.
For example, you can choose whether Windows should:
These controls are available in multitasking settings. I will show them in the next section.
This is probably the biggest productivity improvement.
After snapping the first window, don’t waste time dragging the second, third, and fourth windows into place. Let Snap Assist do the work.
That’s the entire point.
Over time, I’ve started using different Snap Layouts depending on what I’m doing.
I don’t use four-window layouts when working because I find too much information distracting. It’s ideal on larger displays or when you need to monitor multiple apps simultaneously.
If Snap Layouts don’t behave the way you want, I wouldn’t recommend turning the entire feature off immediately.
Instead, customize it.
Microsoft’s built-in controls include options for Snap Assist suggestions, maximize-button Snap Layouts, top-of-screen Snap Layouts, Snap Groups, and edge snapping behavior.
Windows 11 Snap Layouts are excellent for most people. But there is a point where the built-in layouts become limiting. This is especially true if you have an ultrawide monitor or a very specific workspace arrangement.
That’s when FancyZones, part of Microsoft PowerToys, becomes worth considering. Unlike the predefined Snap layouts in Windows 11, FancyZones lets you divide your screen exactly the way you want. You can create multiple custom layouts for different workflows and quickly switch between them using keyboard shortcuts.
Once you install PowerToys, the feature is enabled by default; no setup required. To start snapping windows, simply hold down the Shift key while dragging a window. Your custom zones will appear, and you can drop the window into the section you want.
You can also customize the keyboard shortcuts and mouse actions that trigger FancyZones directly from the PowerToys settings. This gives you far more control over how windows behave compared to the standard Snap Layouts feature.
However, I wouldn’t recommend installing it just because you can. For most users, Windows 11’s built-in Snap Layouts are enough. But if you’ve reached the point where you’re constantly thinking, “I wish I could divide my screen exactly this way,” FancyZones is the logical next step.
Snap Layouts may seem like a small Windows 11 feature, but it can make multitasking much easier. Instead of constantly dragging and resizing windows, I can organize my apps in seconds using a layout that fits what I’m working on.
Whether you prefer using the maximize button, the keyboard shortcut, or simply dragging a window to the top of the screen, there are plenty of easy ways to get started. And if the built-in layouts aren’t flexible enough, FancyZones gives you even more control.
So, how do you manage multiple windows on your PC? Are you a Snap Layouts user, or do you still prefer manually arranging your desktop? I’d love to know which method works best for you.
You might also like: