How to add funds to Apple ID balance on iPhone, iPad, and Mac
Things to know:
- Ensure that you have a valid payment method. Even if you pay using your Apple Account funds, certain transactions may still need a credit card to be on file.
- Check if you can use your Apple Account balance in your country or region.
- You can’t pay to send gifts or gift cards using your Apple Account balance.
- You are not allowed to use the store credit on Apple Online Store. Besides, you can not exchange unused Apple Account balance, App Store & iTunes Gift Cards, or Apple Gift Cards for cash.
Is your App store credit running a little low on cash? You can add money to your Apple Account balance in multiple ways. The easiest way to get it done is by using the iOS or macOS App Store. You can use the credit to purchase the App Store content and iCloud storage plans. Moreover, Apple lets you keep track of your store credit so that you can plan your spending smartly. Let’s know how to add funds to your Apple ID balance.
Why should you use Apple ID balance instead of other payment methods?
You can continue your subscriptions and purchase apps or services using your Apple ID balance. Other payment methods might sometimes fail. However, Apple ID balance is trustworthy.
The best part is Apple sometimes offers tempting discounts. While adding funds to Apple ID, you might occasionally get some extra credit. So, it’s a win-win situation for both!
How to add money to Apple ID balance on iPhone and iPad
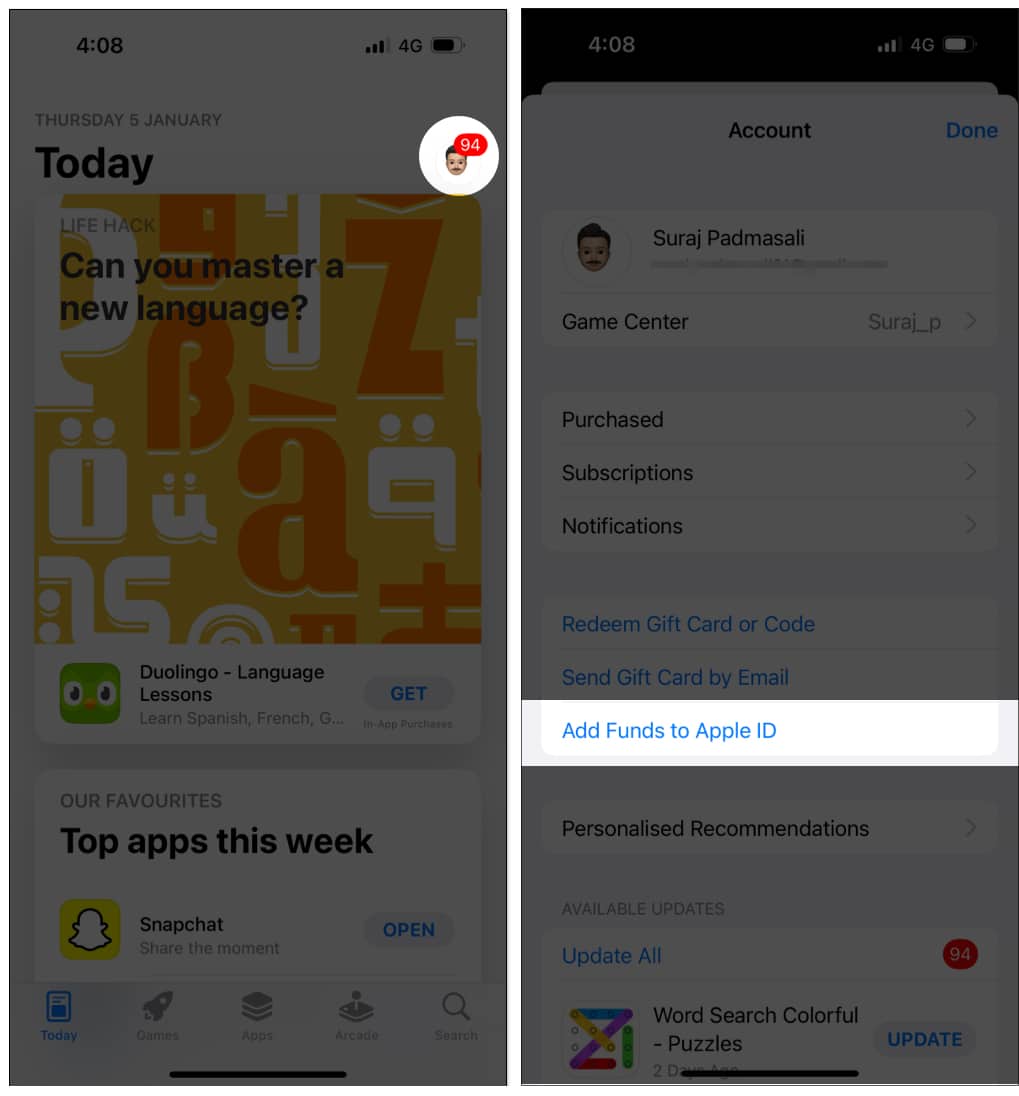
- Launch App Store.
- Now, tap the profile icon at the top right.
- Next, choose Add Funds to Apple ID.
- Select the amount that you want to add to your account.
If you want to go with a custom amount, tap on Other. - Now, enter the amount and then tap Next.

- Choose a payment method if you have added multiple payment methods.
- Finally, authenticate the payment. You may be asked to confirm your purchase through text message by certain payment options.
To finish the transaction, adhere to the onscreen directions. If it tells you to sign in using your Apple ID password repeatedly, even after you input it properly, close the App Store and try again.
Alternate method to add funds to Apple ID balance on iPhone
There is another way to add money to your Apple Account balance.
- Open the Settings app on your iPhone.
- Tap your name (Apple ID) → Payment and Shipping.
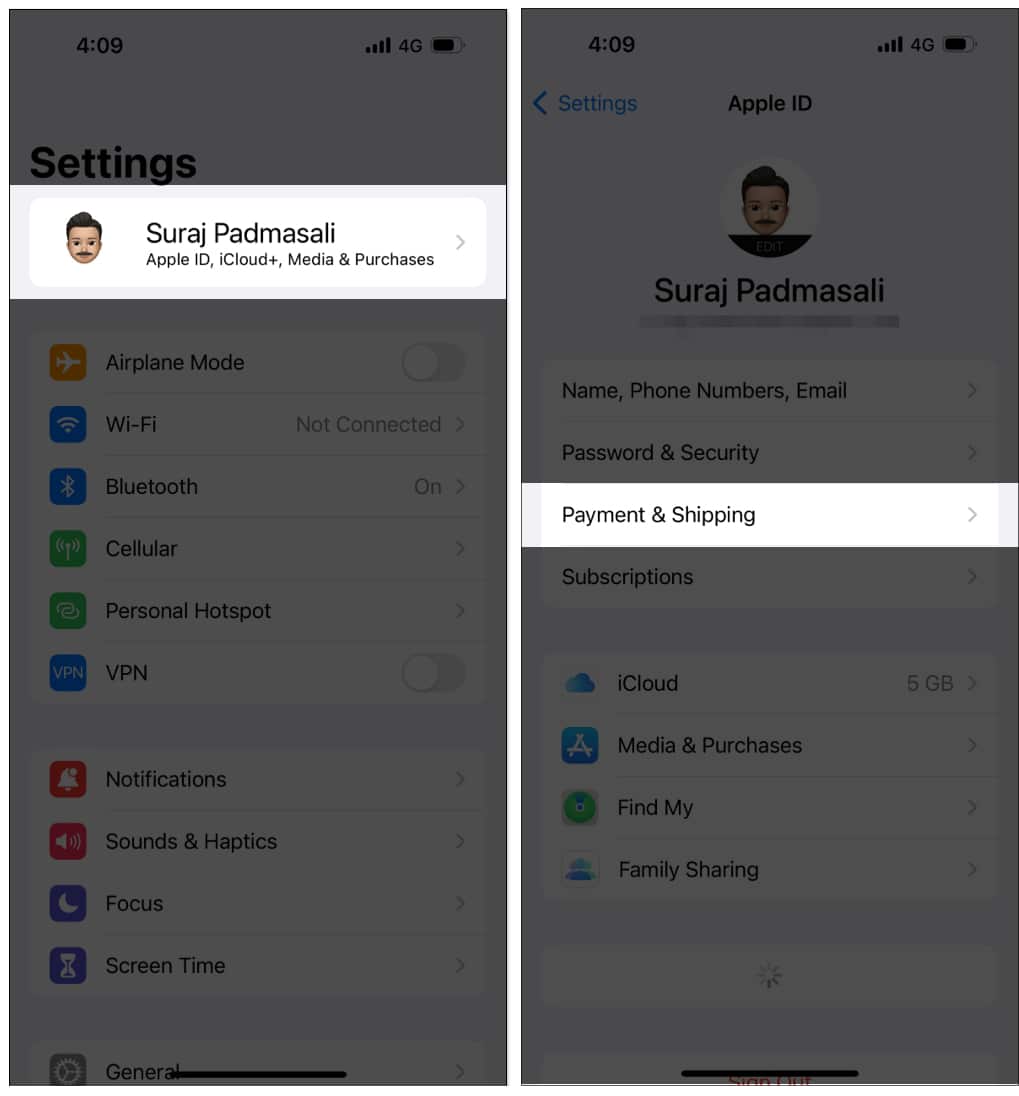
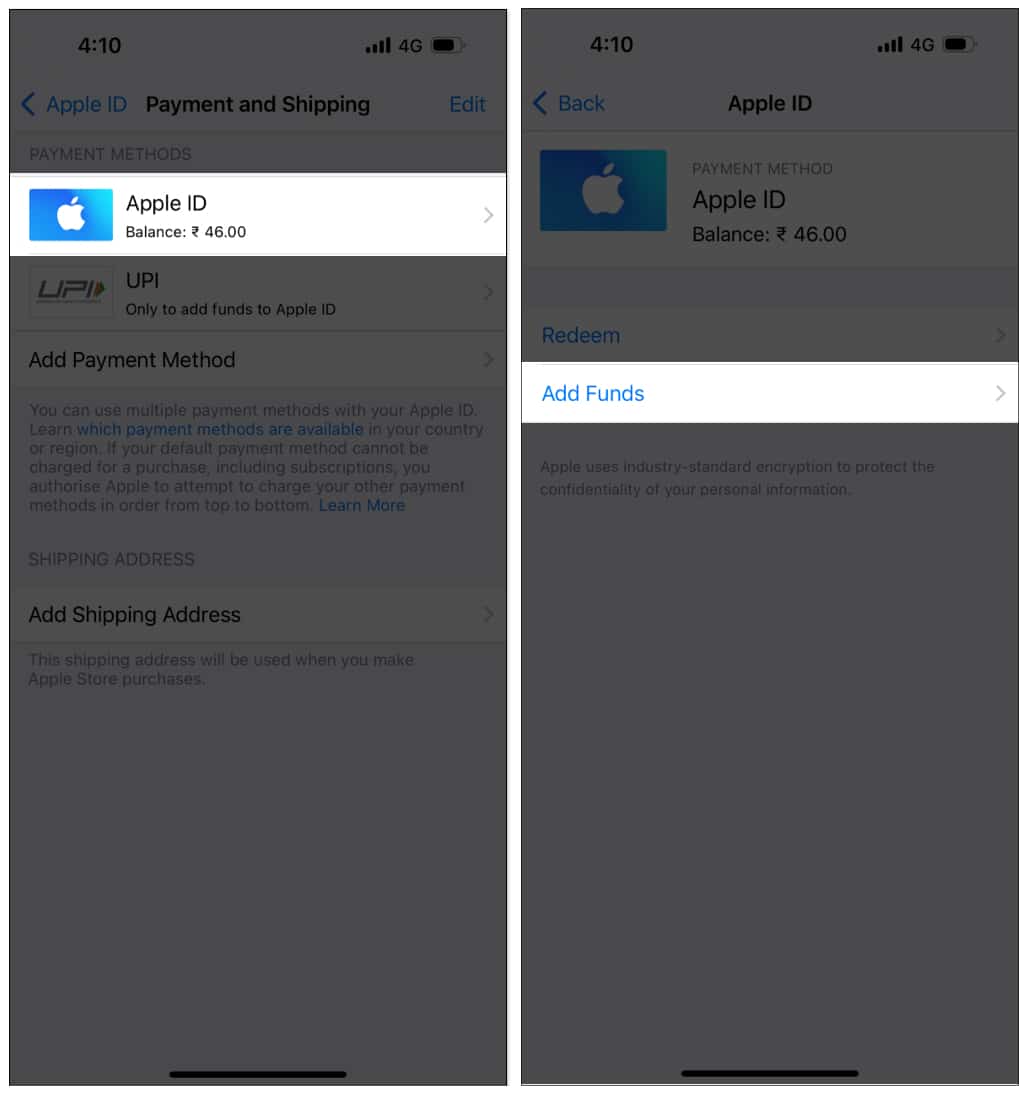
- Choose Apple ID → Add Funds. Then follow the same steps 4-7 as mentioned above.
Check your Apple Account balance on iPhone and iPad
After you have successfully done adding funds to your Apple ID, you may check your available credit.
In the App Store: Tap your profile at the top right → Tap your account → You will see your Apple ID balance. If your Apple ID does not have any balance, no amount will be shown.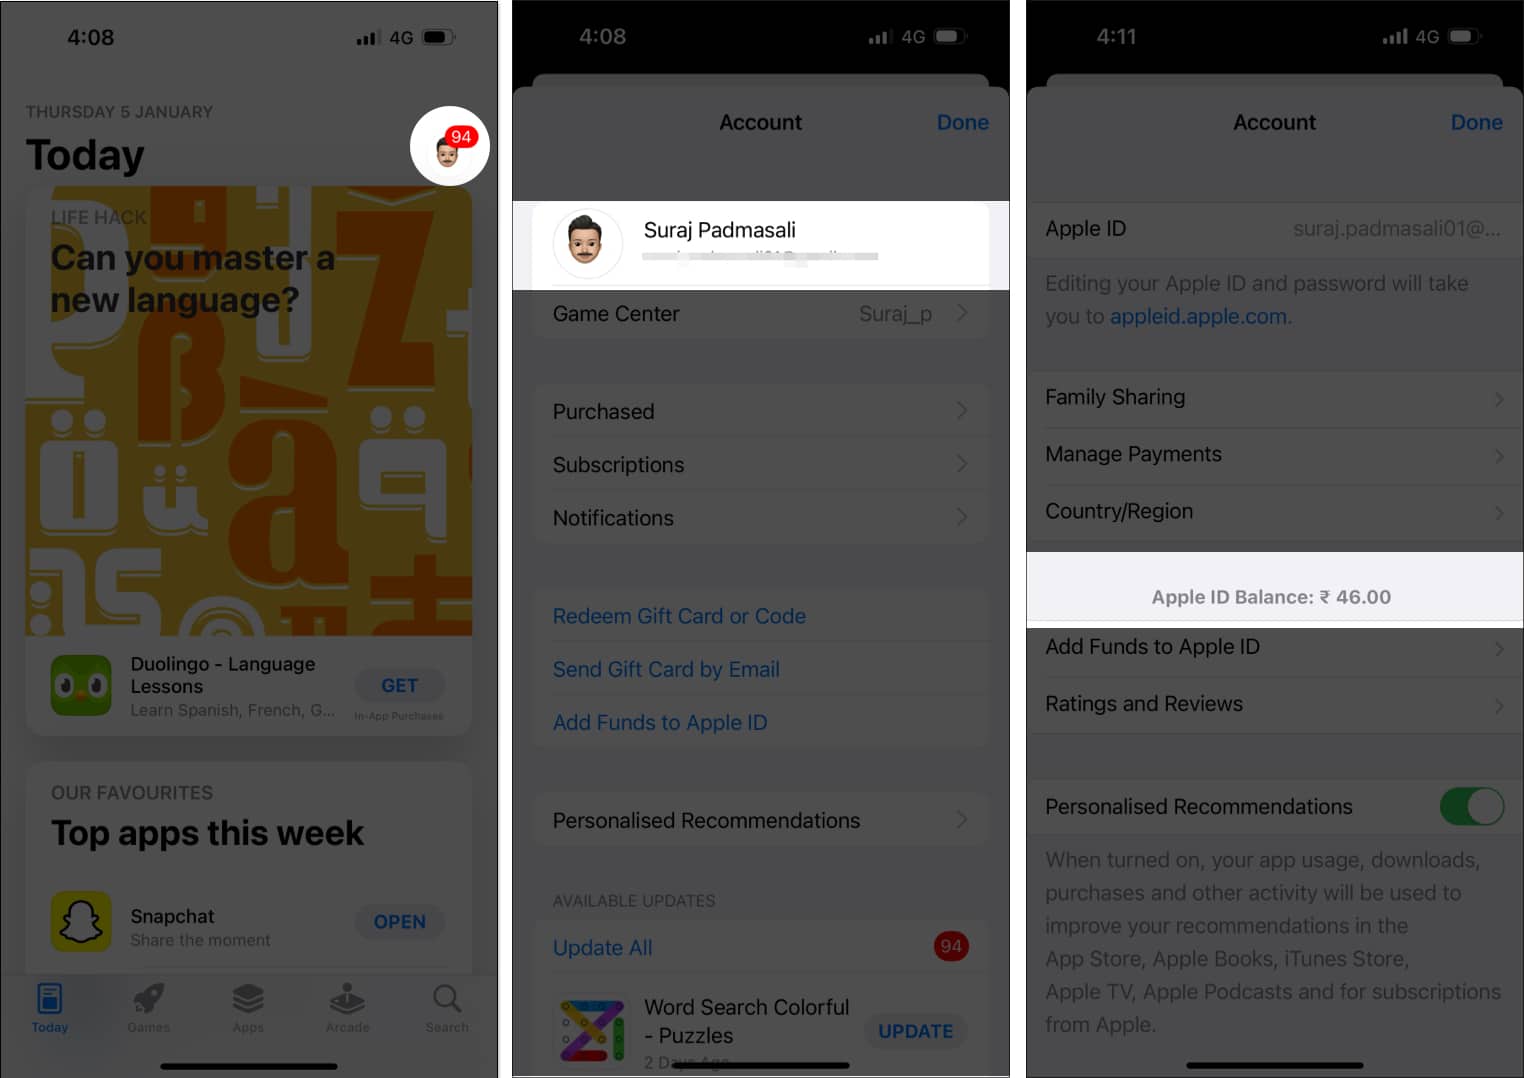
In the Settings app: Tap your name card (Apple ID) → choose Payment and Shipping. You will see the available amount next to Balance under Apple ID.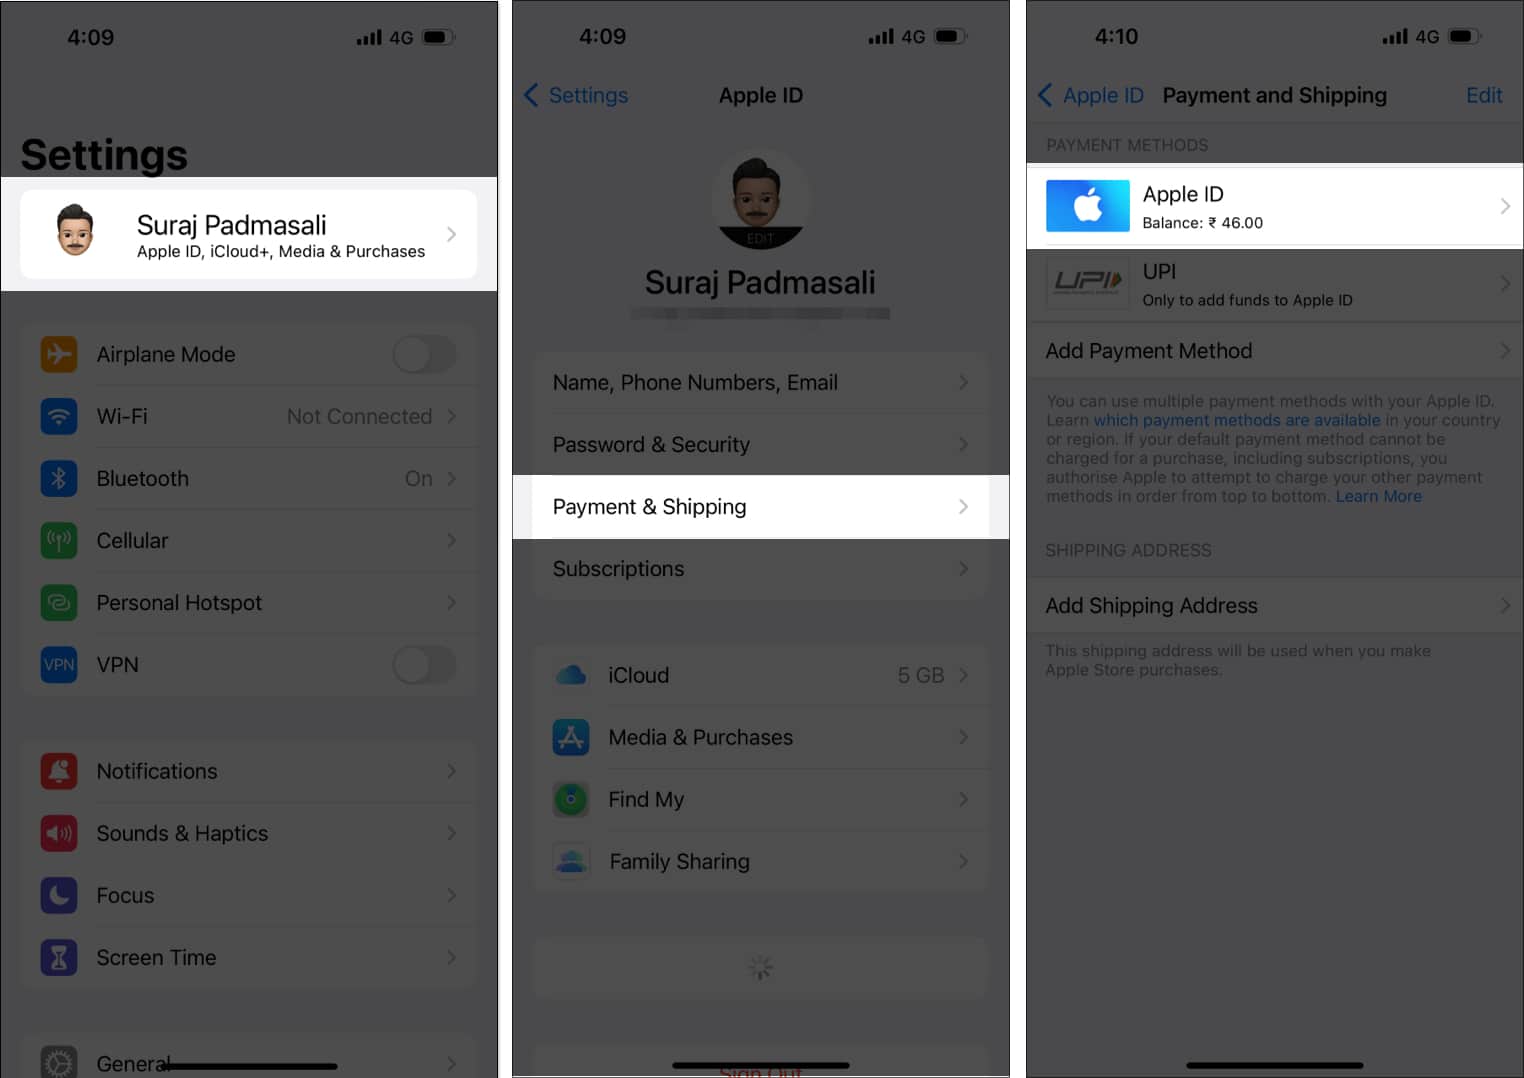
How to add money to Apple ID balance on Mac
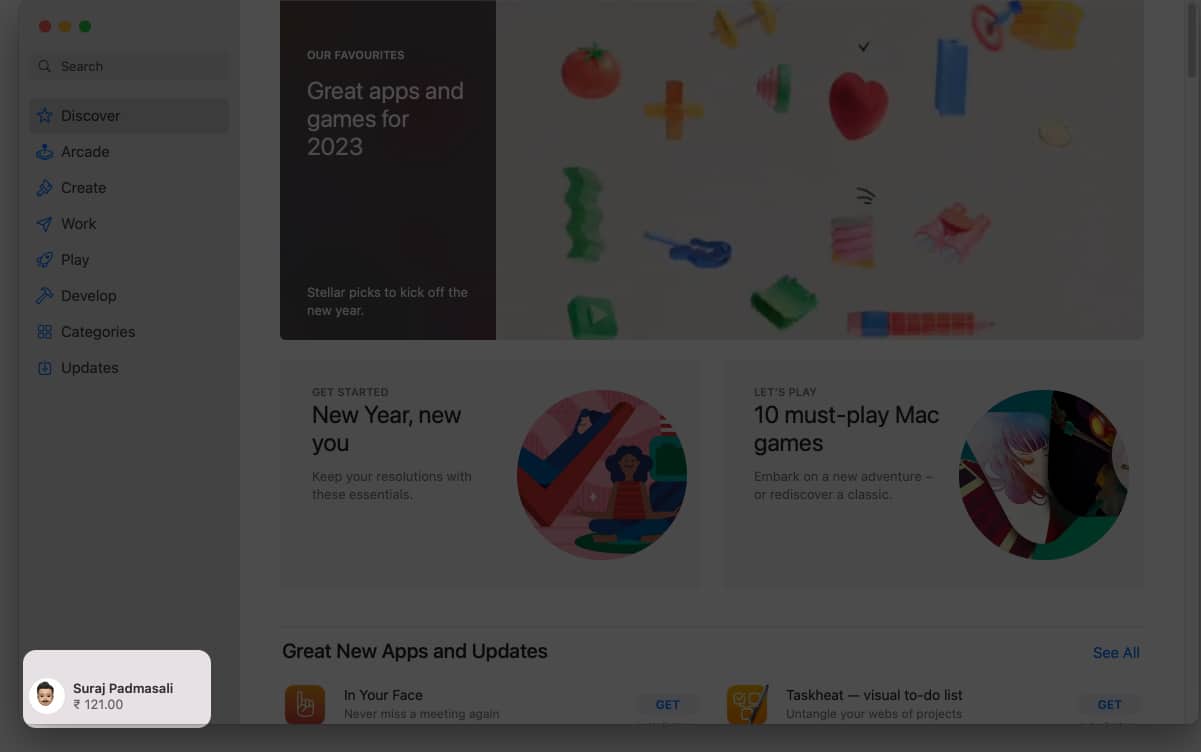
- Launch the App Store on your Mac and tap your name at the bottom. It may ask you to sign in to your Apple ID.
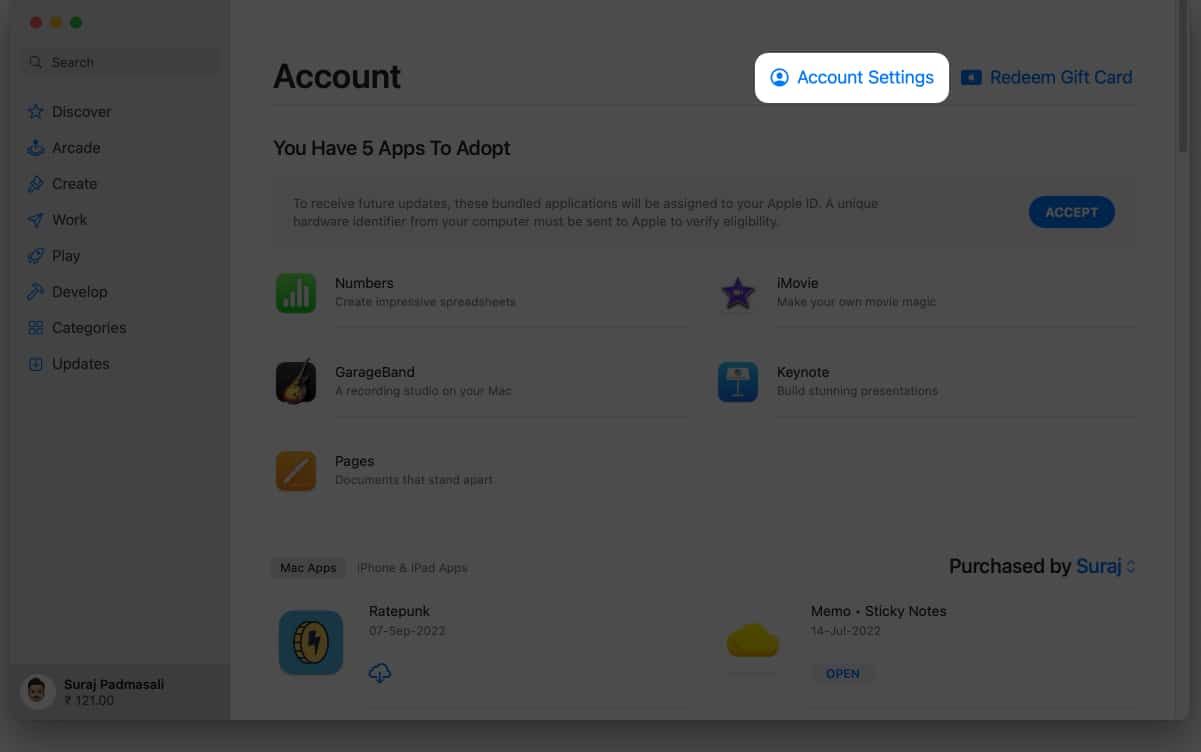
- Click View Information or Account Settings from the top. It will open the account information page.
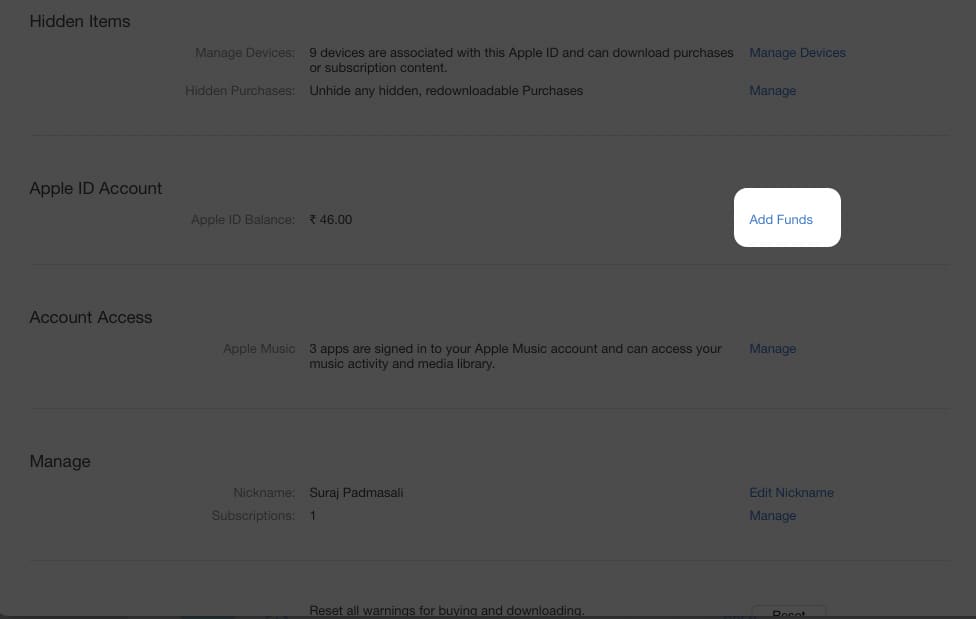
- Scroll and choose Add Funds or Add Money.
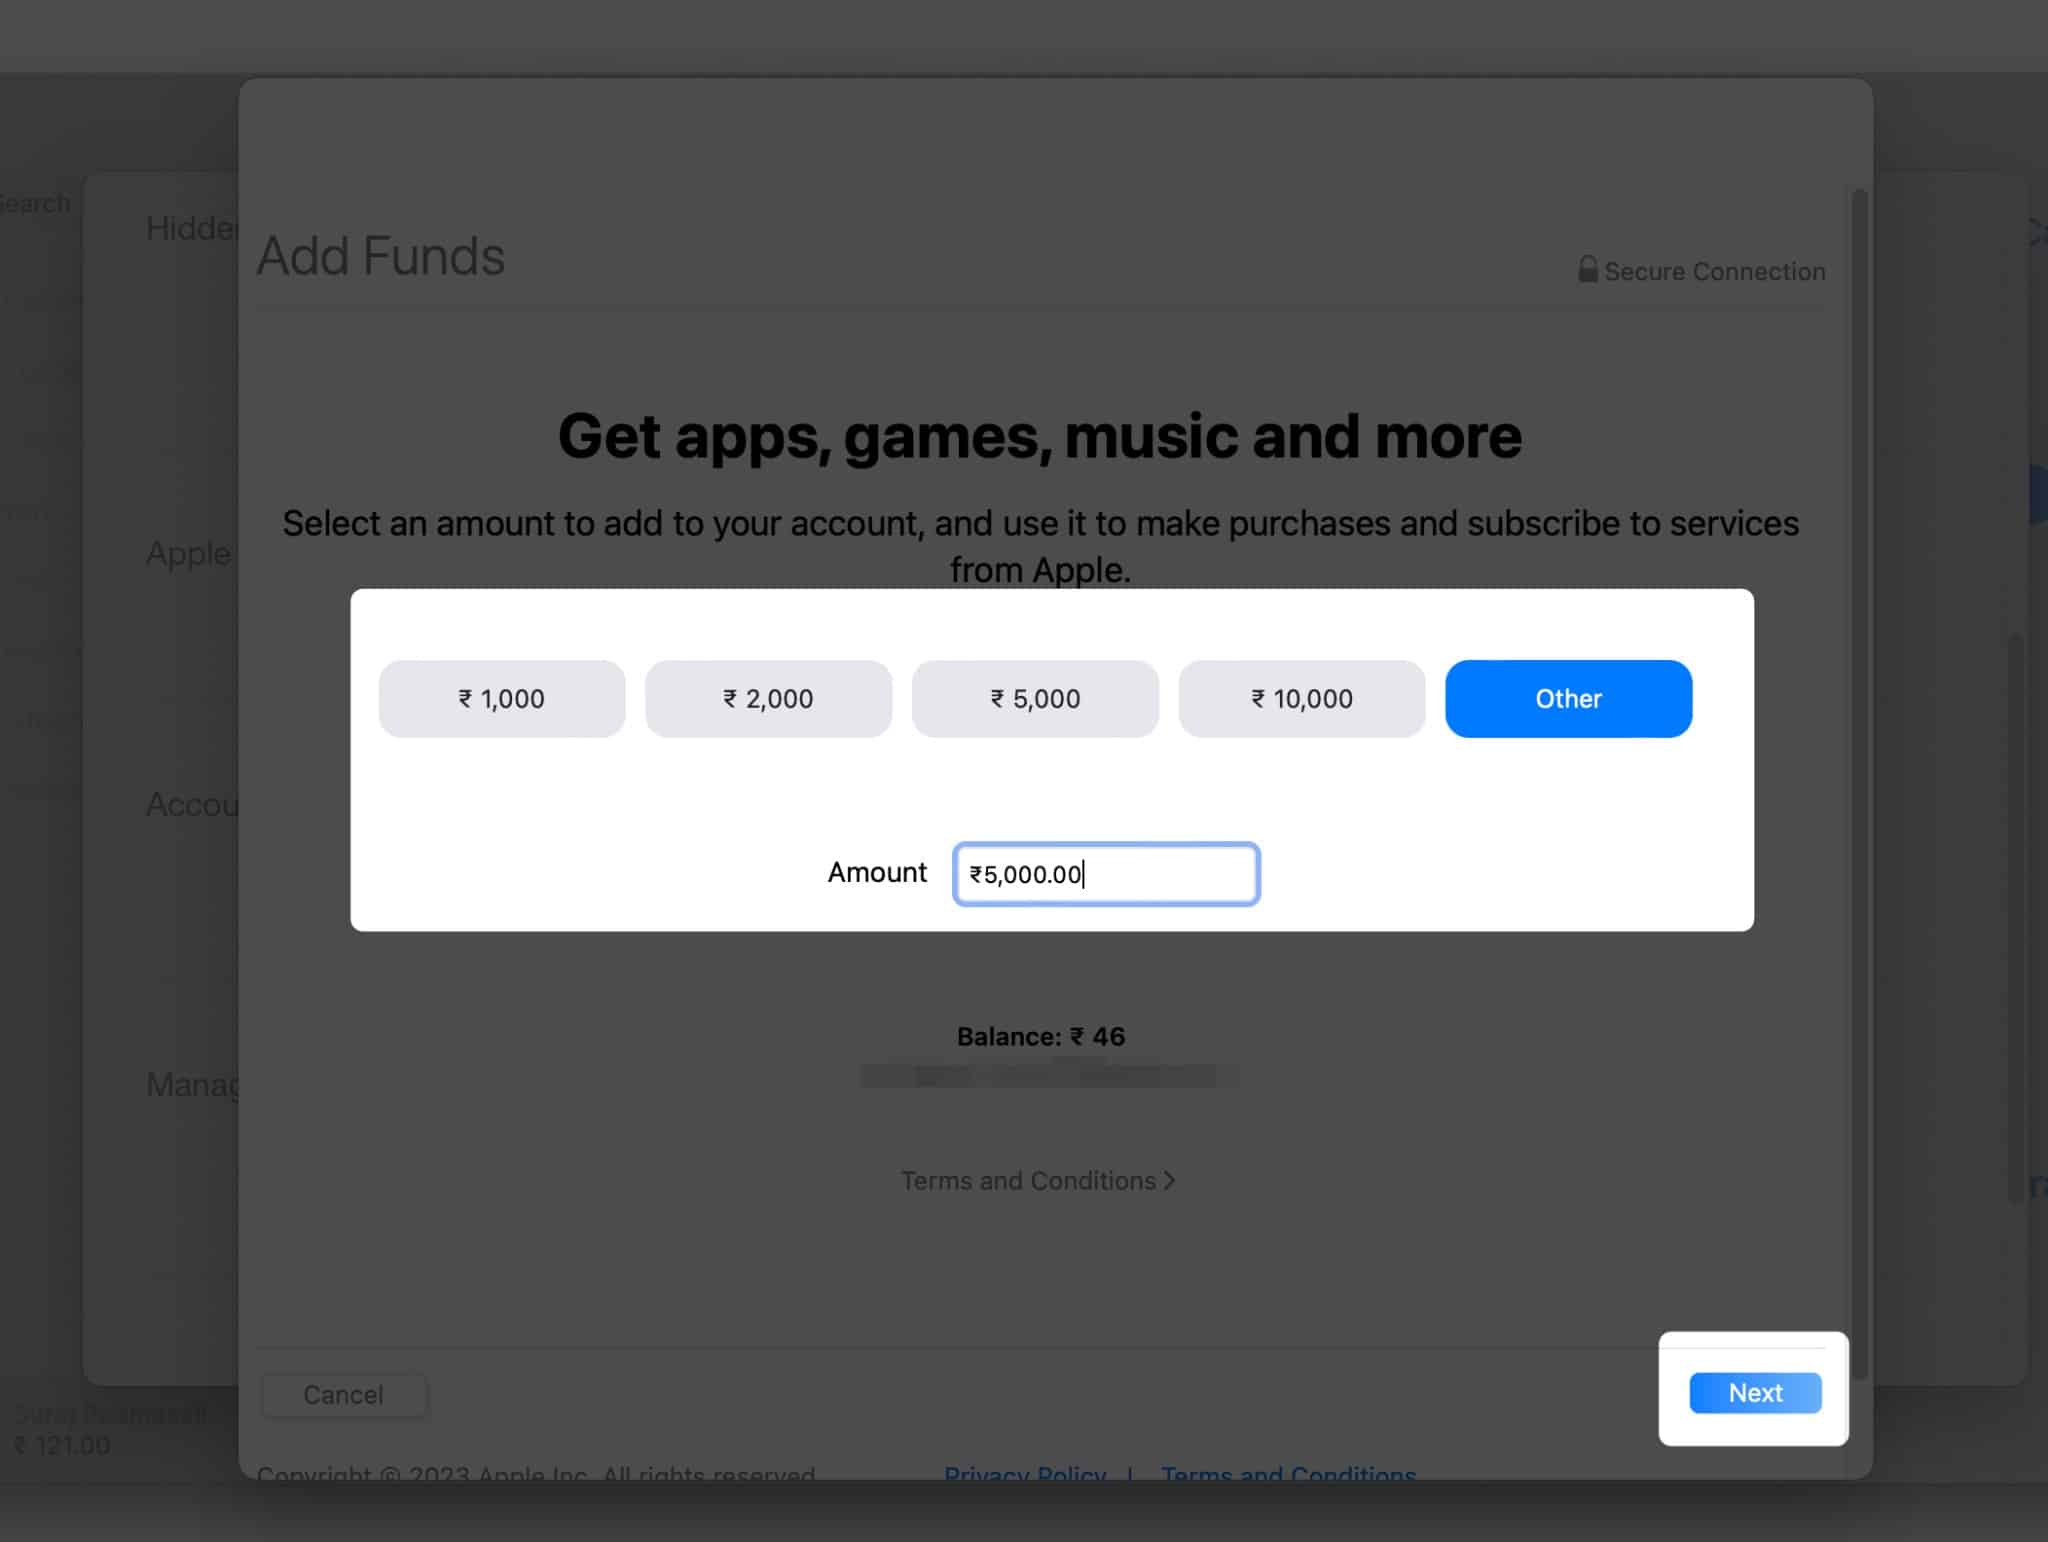
- Next, select an amount from the given options. If you wish to choose a different amount, click Other and then enter it manually. Then, click Next.
- Then, confirm your payment.
You can also add money to your Apple Account balance from Music, TV, or iTunes app. Launch anyone on your Mac. Then click Account → View My Account → enter your Apple ID password → Account → Add Funds. After that, choose the amount and confirm.
Check your Apple Account balance on Mac
Checking your store credit is pretty simple. Open the App Store, and your available balance will be shown underneath your name. If you are not logged in, click the sign-in button at the bottom of the sidebar. Also, you don’t have a balance if there is no amount shown.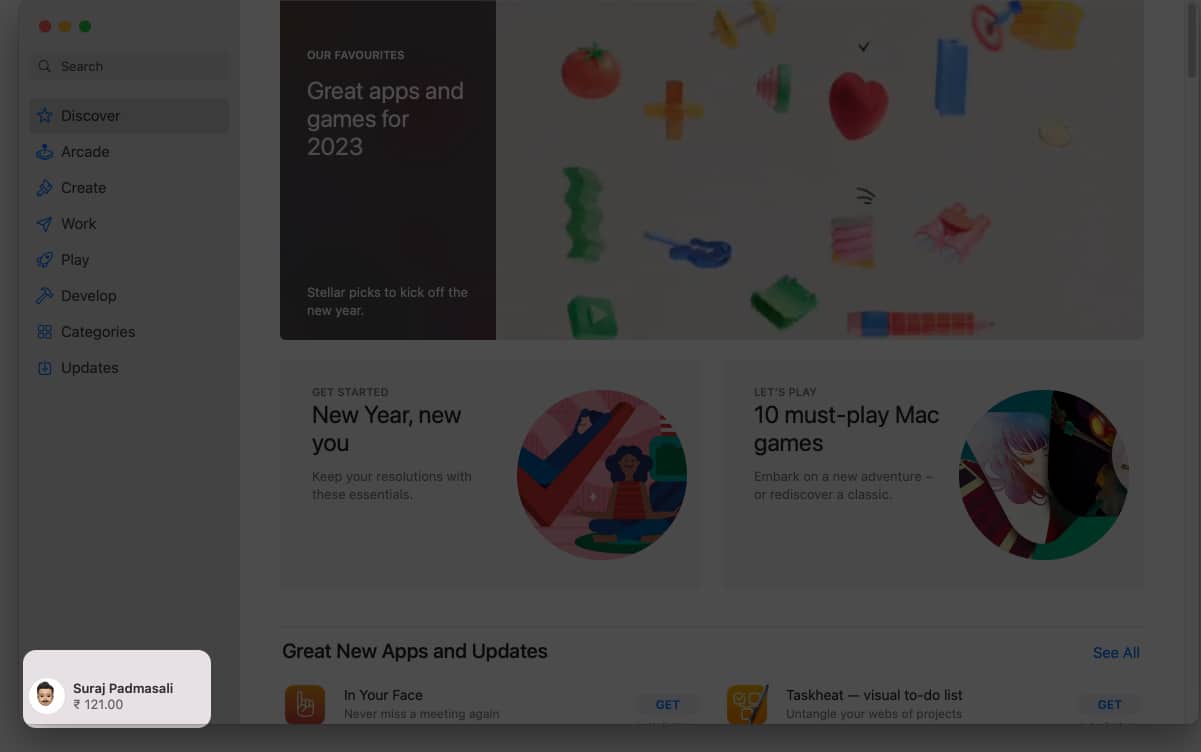
How to automatically top up your Apple Account balance?
Apple offers to automatically top up your Apple account balance. So, whenever the credit is running low, money will be added by default. Besides, you have the option of weekly, bimonthly, or monthly balance top-ups. To enable it, choose Set Up Auto Reload when choosing the Apple ID balance.
If you do not see the option, the feature is not available in your nation, or your payment method does not support it. You may stop automatic deduction anytime. Just return to the Add Funds page and tap Turn Off Auto Reload.
What to do if you are unable to add funds to your Apple ID?
You may be having trouble adding funds to your Apple ID if your payment method is rejected. You may verify whether your card information is accurate and have adequate funds to withdraw. If the problem persists, you may change Apple ID Payment Method on iPhone, iPad, and Mac.
Sometimes the payment fails due to a bad internet connection. So, make sure you have a stable network, either Wi-Fi or cellular. You may also restart your device, sign out and sign in with your Apple ID, and try adding funds to your Apple ID after a few minutes.
FAQs
Your family members cannot use your Apple Account balance. You alone have access to it. If your balance is insufficient to pay, the Family Sharing organizer will pay the remainder.
If your Apple account balance is exhausted, then the credit score will not appear. If the amount showing is incorrect, sign out of the App Store and restart your iPhone. Then log in and double-check your balance. You may also view your purchase history to verify your spending. If you made a mistaken purchase, you may seek a refund directly from Apple.
So, that’s all for today, folks!
Adding funds to your Apple ID allows you to make purchases on the App Store and iCloud. So, it is a convenient way to pay for apps, games, music, movies, etc. You may use your credit or debit card, redeem a gift card, or use Apple Pay. Do you use an Apple account balance? Let me know in the comments below!
Explore more…


