How to use Live View in Google Maps on iPhone
Things to know before:
- The feature is accessible only in London, Los Angeles, New York City, Paris, San Francisco, Tokyo, and some selected countries.
- The walking area should have Street View coverage.
- Google doesn’t recommend using Live View for car directions.
- Holding your phone in front of you while walking may lead to accidents; use the feature responsibly.
Are you tired of searching for your location on Google Maps? Whenever I explore a new city or try to find my way in a busy neighborhood, I use Live View in Google Maps on my iPhone to reach my destination. It shows real-time directions and overlays them onto the live feed from your camera.
Thus, you can find your way around unfamiliar areas easily. But how to access it? In this blog, I will guide you on how to use Live View in Google Maps on your iPhone so you can enjoy a more seamless navigation experience. So, let’s get started!
- How to use Google Maps Live View on iPhone
- How to exit Live View in Google Maps on iPhone
- How to improve the accuracy of location with Google Live View on iPhone
- How to know whether Live View works
How to use Google Maps Live View on iPhone
To improve the navigation experience, Google has added AR walking directions and a Live View feature. It uses your phone’s camera to recognize your surroundings and displays virtual markers and arrows, directing you toward your destination. You can also obtain the 2D direction with Live View on a mini-map at the bottom.
- Open the Google Maps app on your iPhone.
- Enter a destination in the search field or drop a pin on the map.
- Tap Directions.
- Select Walking from the toolbar.
The starting point should be your current location. - Tap Live View.
- Adhere to the on-screen AR directions to let Google Maps identify your location.
Point your phone camera away from trees and people and focus on the structures and signs across the street.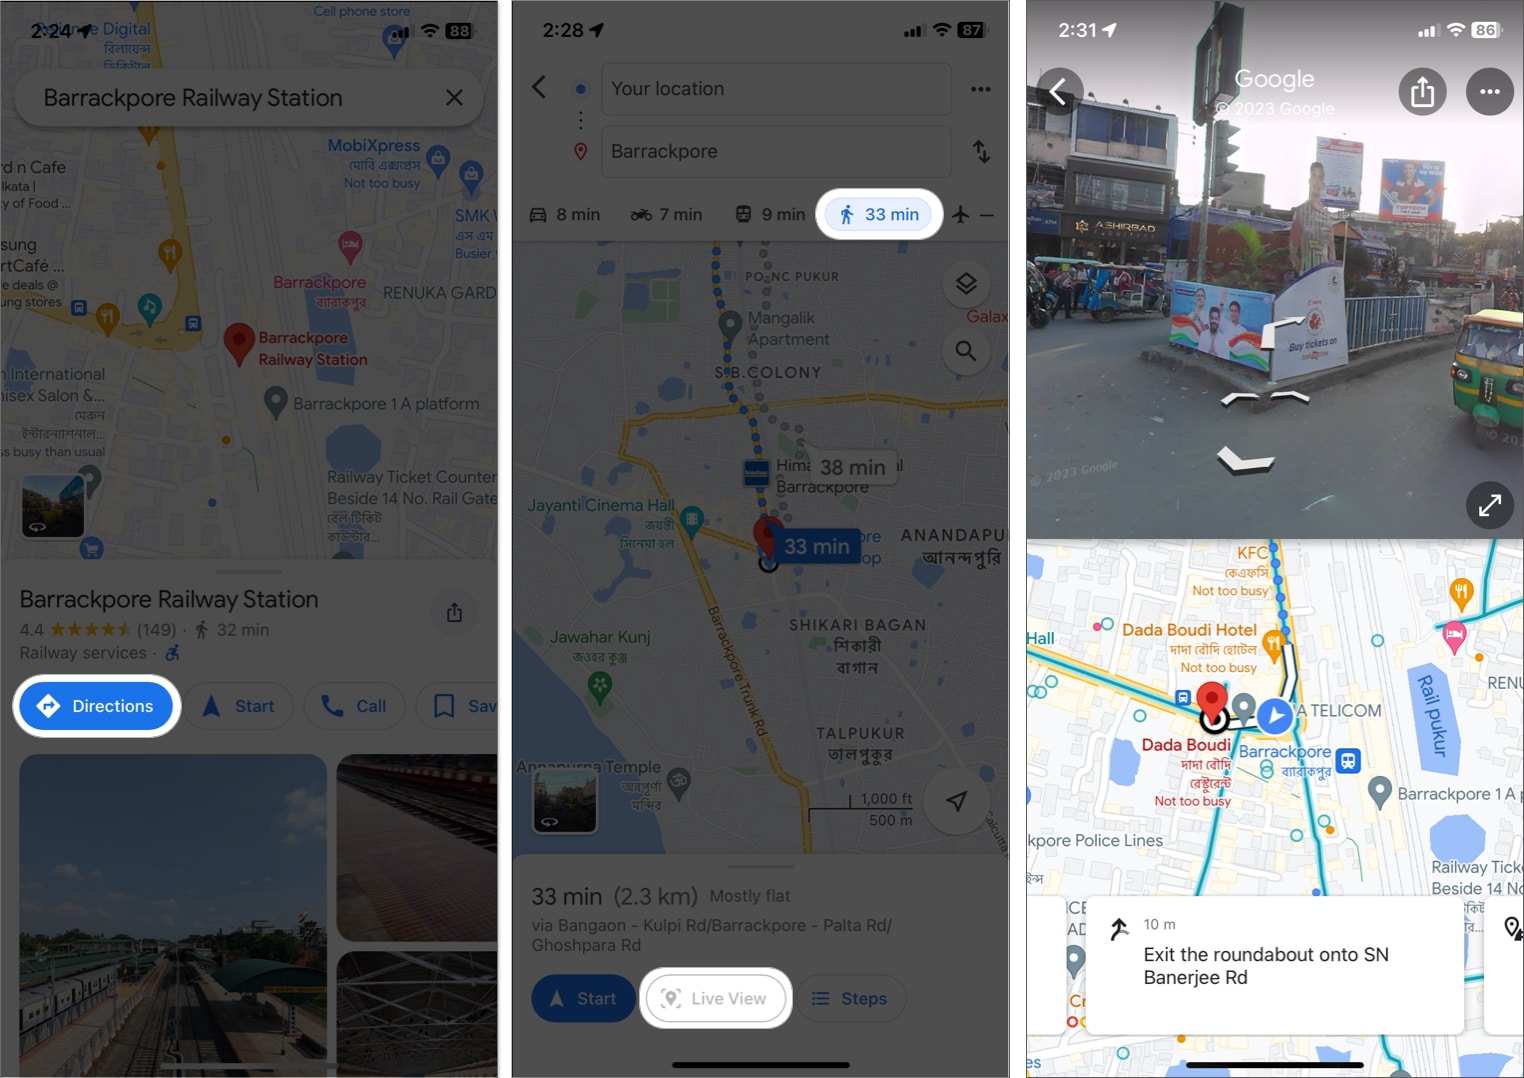
- Now, you will see instructions via the camera view on your iPhone.
When you use the feature for the first time, Google Maps will show prompts explaining the feature and asking for camera access. Tap to continue and grant permission.
How to orient yourself with Live View
Rather than understanding the map and navigating accordingly, you can quickly get familiar with your surroundings and explore local attractions with the Google Maps Street Live View feature on your iPhone. Most Live View-supported landmarks are famous parks and tourist hotspots like NYC’s Empire State Building.
You can use Live View on Google Maps in two ways:
- Search for the location → Choose Live Maps from the direction menu.
- Go through any category, like restaurants or shopping malls → Choose View Map → Pick one from the options → Tap Live. Once you enter Live View, follow the abovementioned steps.
Now you know how to navigate with Google Maps Live View on your iPhone, let’s see the method to exit the feature.
How to exit Live View in Google Maps on iPhone
After getting the correct route, I exit the Live View as it drains your iPhone battery fast and may cause overheating. Also, walking on the street while watching your phone screen is dangerous. Though you exit the Live View, your will vibrate upon reaching the next navigation step. So, you will not ever lose your path.
- Tap the top-left arrow on your camera feed.
- It will open the 2D map view.
- Swipe up from the bottom → Tap Directions.
Whenever I feel confused, I just return to the Live View again. For that, just tilt your phone to the vertical position or tap the Live View button. Once you reach the destination, you should end the route and instructions by selecting Exit.
Switch between Live and 2D Map view automatically on iPhone
If you frequently use Google Maps Live View on your iPhone to navigate, enable switching to Live View automatically. It will enable the Live View when you hold your phone vertically and return to the 2D map view horizontally.
- Open Google Maps → Tap your profile icon.
- Select Settings → Navigation.
- Toggle on Live View.
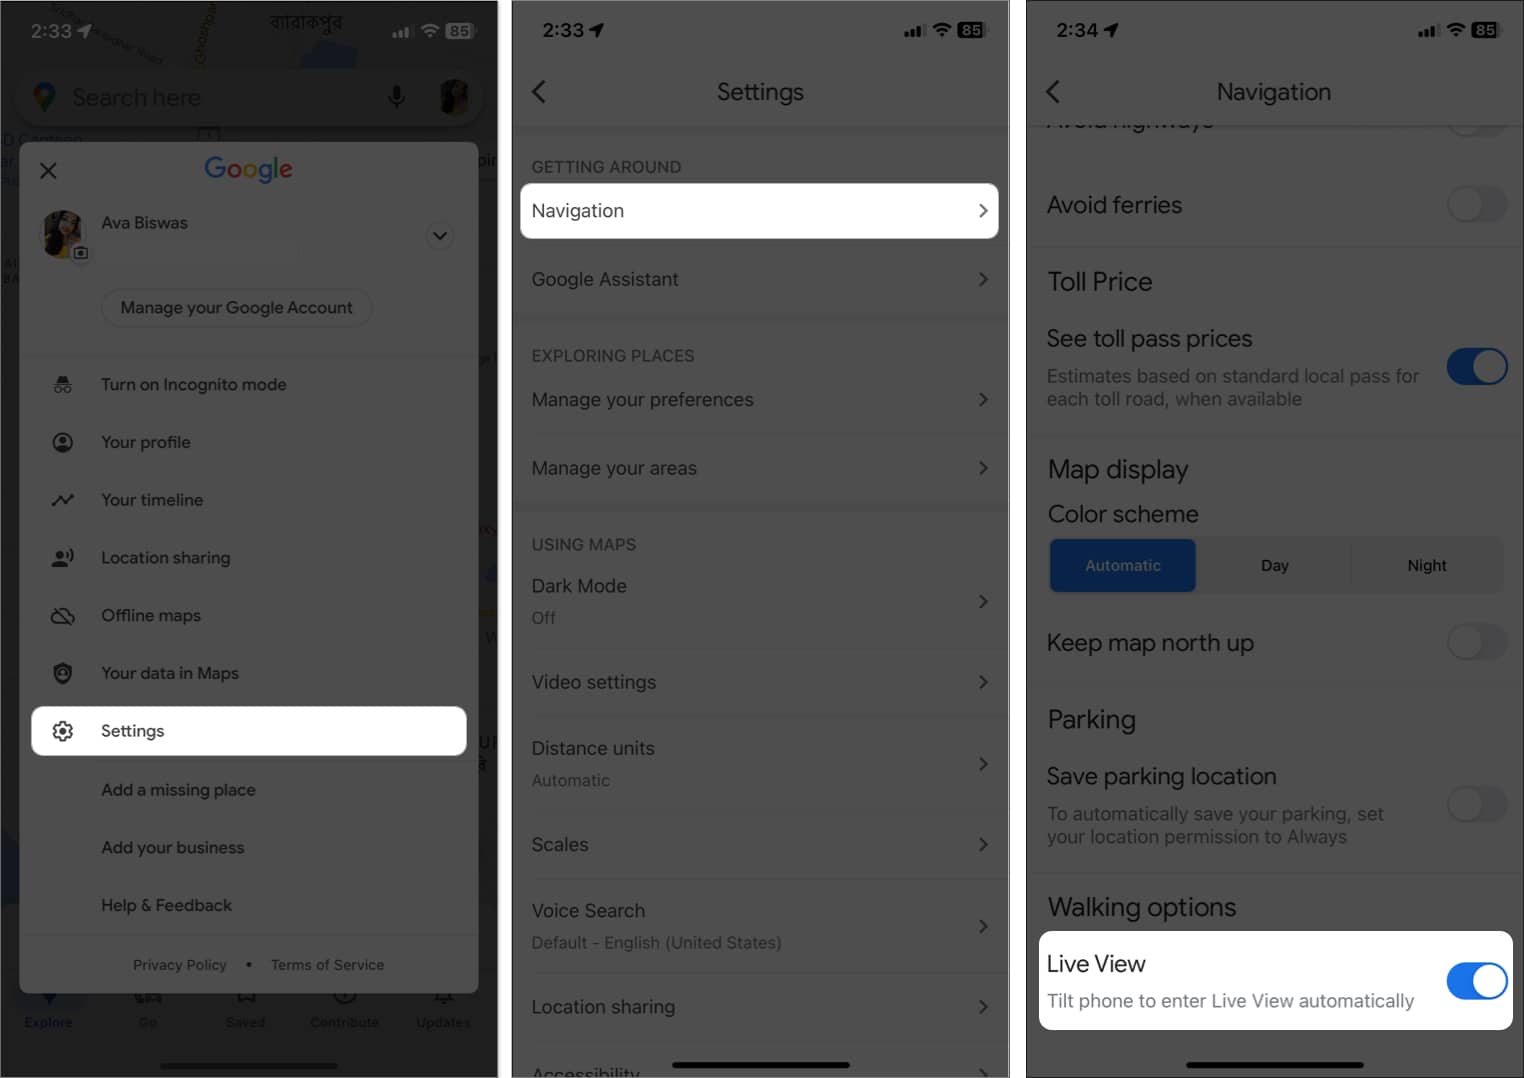
If you don’t like the tilt feature, you can turn it off from here.
How to improve the accuracy of location with Google Live View on iPhone
When you open the Live View camera feed, it takes time to determine your location, depending on your surroundings. As more information is collected about your location, your position on Maps gets more precise. So, next time, you will get the navigation directions quickly with more accuracy.
- Open Google Maps while traveling.
- Tap the blue dot to detect your location.
- Select Calibrate with Live View.
- Point your camera at nearby structures and sign boards for more precision.
- Follow the directions shown on the screen.
You may not get the Live View Calibrator if the Street View is unavailable for that location or the surroundings are not right. But how do you know if Live View is working?
How to know whether Live View works
Google has a database of street views to recognize different locations. Therefore, turning on the Live View feature prompts you to aim your camera toward buildings, street signs, or other significant landscapes. So Google Maps may identify your location using local Street View data to show directions on your phone.
If Live View still malfunctions, ensure you are in:
- Locations with good lighting
- Outdoors
- Places to capture the buildings and signs across the street
- Anywhere Street View is available
It’s indeed daunting to find places to explore the Live View feature. However, I have found a trick to know whether a place supports Street View. Let’s jump in!
How to find places with Live View on iPhone
- Go to Google Maps.
- Tap the camera icon in the search box.
- Focus your camera on buildings or signs.
- If Live View is available, it will display a Ready! message with annotations of neighboring locations.
- To learn more about the location, hover or touch on an annotation.
Watch your directions while walking!
No longer will you need to rely solely on maps or directions – with Live View, you know exactly where to take turns and how to get there in real time. In addition, its camera overlay makes finding your way around new areas more effortless. Following the simple steps above, you can use Live View in Google Maps and experience a more seamless and intuitive navigation experience.
Explore more…


