Mac Recovery Mode not working issue? 14 Tips to fix it
Mac Recovery Mode can help you troubleshoot and fix problems with your Mac. However, sometimes Recovery Mode may not work, which can be frustrating. If you’re having trouble booting into Recovery Mode, don’t worry! Here are a few solutions you can try to fix the problem.
- Possible reasons why Command + R isn’t working on Mac
- Did you accidentally delete the Recovery partition?
- If your Mac is running macOS Sierra or earlier
- If your Mac runs macOS X Snow Leopard or earlier
- How to check if Recovery partition is working on Mac
- Use Terminal to check if your Mac has a Recovery partition
- Try this fix to force the Recovery partition to appear
- Restore a Mac without a Recovery partition
- Use Internet Recovery to reinstall macOS
- Create a macOS bootable installer on a flash drive
- How to get macOS installation files
- Make a Bootable macOS installer
- Createinstallmedia commands for different macOS versions
- Install macOS from the bootable installer
1. Possible reasons why Command + R isn’t working on Mac
First and foremost, make sure you’re using the right keyboard shortcut. While Command (⌘) + R works on most Macs for entering macOS Recovery, it isn’t the only option. That aside, there are many other reasons why macOS Recovery Mode may not work.
Have a Mac With a T2 Chip? Try A Different Keyboard Shortcut
Command (⌘) + R shortcut may not work on your Mac with a T2 Security Chip. If it’s the case, try Option/Alt + Command (⌘) + R to enter macOS Recovery Mode.
For the uninitiated, T2 Chips are the second generation custom silicon for Mac. It endows an advanced level of security by leveraging enclave coprocessors.
The following Macs come with Apple T2 Security Chips:
- iMac Pro
- Mac Pro 2019
- Mac mini 2018
- MacBook Air 2018 or later MacBook Pro 2018 or later
Note: There’s also an option to check whether your Mac has a T2 chip or not. Click the Apple icon at the top left corner of the screen. Now, press and hold the Option key and select System Information. Next select Controller or iBridge in the sidebar. Now, you should see the Apple T2 chip on the right if your Mac supports it.
Make sure your keyboard works properly
Another thing worth keeping in mind is ensuring your keyboard isn’t faulty. Test both your R key and Command keys independently. If you have any trouble, try another keyboard.
If you find that everything works properly now, you can be certain your Mac’s keyboard is at fault. You need a new Mac keyboard, check out this extensive roundup.
2. Did you accidentally delete the Recovery partition?
Maybe you accidentally deleted the Recovery partition while installing Windows via Boot Camp or replacing the HDD on your Mac. Or, perhaps the Recovery partition has been corrupted.
- Restart your Mac and immediately press Command (⌘) and R to enter macOS Recovery.
- If Command (⌘) + R didn’t work for you, try out the Option/Alt + Command (⌘) + R when you boot up to activate Internet Recovery Mode.
- Now you can access an Apple server to download the latest macOS version.
Note: You can also use the Shift + Option/Alt + Command (⌘) + R on your Mac to install the macOS version that came preinstalled.
3. If your Mac is running macOS Sierra or earlier
If your Mac is running anything older than macOS Sierra (introduced in 2016), it won’t have all the Recovery options.
4. If your Mac runs macOS X Snow Leopard or earlier
Does your Mac support recovery partition? If your Mac computer is running OS X Snow Leopard or older, it won’t be equipped with a Recovery partition. In this scenario, you need to use the original discs that came preinstalled with your Mac to get the job done.
If you don’t have those discs, you can purchase them from Apple.
5. How to check if Recovery partition is working on Mac
Sometimes, the macOS Recovery partition just doesn’t seem to kick in. So, if you’ve done everything right but still can’t activate or use it, be sure to check if the partition is working correctly.
- Shut down your Mac [Simply click the Apple icon in the toolbar and select Shut Down. Now, hold down the Command (⌘) + R keys and press the Power button.
- Now, make sure to hold down the Command (⌘) and R keys until the Apple logo shows up on the screen. After that, release the keys.
- Next, allow the Mac to enter Recovery Mode.
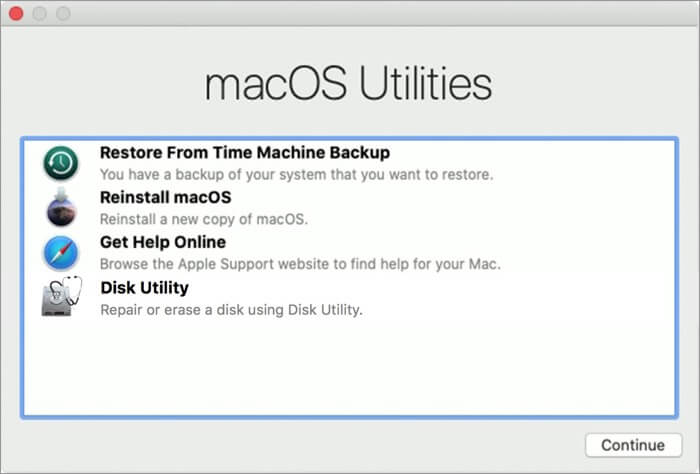
Note: On the latest macOS versions, you’ll see macOS Utilities; while in the older macOS versions, OS X Utilities will appear.
If this screen appears, your Mac is working properly. Now, reinstall macOS as usual.
But if a blank screen appears, or the Mac boots up to a different screen, the Recovery partition is not working.
6. Use Terminal to check if your Mac has a Recovery partition
With the help of the Terminal, you can quickly check if your Mac has a Recovery partition or not.
- Launch Terminal on your Mac and then enter the diskutil list. Now, a list of all the volumes and partitions will appear on your computer.
- Next, the first drive (/dev/disk0) should feature a partition. Now, try using the Command (⌘) + R key combination again to see if you’ve resolved the macOS recovery issues on your Mac.
7. Try this fix to force the Recovery partition to appear
Sometimes, macOS Recovery partitions seem to completely disappear without any reason what-so-ever. If you’re facing this scenario, reset PRAM, or reset SMC. To do so, shut down your Mac. After that, hold down Command (⌘) + Option + P + R during the booting process.
When you hear the chimes, release the keys. Now, use the Command (⌘) + R process to see if the macOS Recovery partition has appeared. If it has, you’re good to go!
If none of the tricks so far have worked, it’s time to get on with the possible solutions to reinstall macOS without a Recovery partition. But before getting started, back up your Mac using Time Machine.
8. Restore a Mac without a Recovery partition
Did you know that you can restore your Mac even without the Recovery partition? On newer Macs, the process is a little easier when compared to the older ones.
There are a couple of straightforward ways to restore a Mac without a Recovery partition.
- Use Internet Recovery to reinstall macOS
- Create a boot drive to install a copy of macOS
9. Use Internet Recovery to reinstall macOS
We think this option is the easiest of the two. Moreover, modern Macs can boot directly from an internet connection without relying on the Recovery partition.
- Turn off your Mac. Then, hold down Command (⌘) + Option/Alt + R keys and press the Power button.
- Now, make sure to press these keys until a spinning globe or the message “Starting Internet Recovery” appears on the screen.
- When the macOS Utilities screen shows up, click Reinstall macOS. After that, go through with the installation process.
It’s worth reiterating that it only supports networks using WEP and WPA security. You may face issues if you’re using a proxy/PPPoE network.
10. Create a macOS bootable installer on a flash drive
If you’re unable to access Internet Recovery, create a bootable installer from a flash drive. There are a couple of major requirements for making a bootable install drive.
- A 128GB Flash Drive (Minimum Requirement): Make sure the flash drive is at least 12GB in size). Keep in mind that it will completely wipe out the USB flash drive. So, remember to save all files upfront.
- Installation File: The process of getting the installation file varies based on a macOS version
11. How to get macOS installation files
The process of getting installation files slightly differs from one macOS version to the other. So, follow the below steps to get them with ease.
How to get Big Sur installation files if your mac is running Mojave or earlier:
- Head over to System Preferences → Software Update.
- Now, wait for some time until your Mac has searched for the latest update to macOS.
- Download and Install the update.
Make sure to copy the installation file before installing so that you can have access to it to create a bootable installer.
12. Make a Bootable macOS installer
Creating a bootable installation of macOS is pretty straightforward (since OS X Mavericks) now since it only needs you to put in a single command in the Terminal. What’s more, the createinstallmedia command also lets you make a bootable copy of an installer on any drive connected to your Mac.
Again, it’s worth noting that the createinstallmedia command will erase everything on your external disk. So, make sure to save your important files elsewhere beforehand.
- To get started, plug in an external drive. Make sure it has at least 8GB of space. (12GB is preferable).
- Now, open Disk Utility. Simply, press Command (⌘) + Spacebar and type in “Disk Utility”.
Note: If your Mac is running macOS High Sierra or later, click the View drop-down and select Show All Devices from the options. Now, you can view the external root drive along with the volume. - Now, you need to choose the root drive in the sidebar and hit Erase. After that, be sure to select Mac OS Extended (Journaled) as the Format and GUID Partition Map as the Scheme.
- By default, the drive will be named “Untitled”. However, you can choose to give it a suitable name.
Note: In the Terminal command, replace the term USB with the name you’ve given to your drive. - Make sure to click Erase again. Now, wait until Disk Utility has successfully created the partition and set up the drive. After that, click Done.
- Next, launch Terminal on your Mac and copy the text (below) that corresponds to the macOS version you want to install. After that, click Enter/Return. Then, enter your user password and hit the Return key.
13. Createinstallmedia commands for different macOS versions
The createinstallmedia command will vary based on the macOS version you wish to use.
Ventura
sudo /Applications/Install macOS Ventura.app/Contents/Resources/createinstallmedia --volume /Volumes/MyVolumeMonterey
sudo /Applications/Install macOS Monterey.app/Contents/Resources/createinstallmedia --volume /Volumes/MyVolume- Now, you’ll see a warning saying it will erase the drive. To continue, press Y and hit Return.
- Next up, the Terminal will copy the installer file to the drive. Once it’s done, you’ll get a confirmation “Copy complete and Done”.
That’s it! You’ve created the installer on an external drive, which you can use to install multiple copies of macOS.
Side Note:
- Once the bootable installer is ready, you can simply plug the external drive into the Mac and start it up by holding down the Option/Alt key while it’s booting up.
- When the Startup Manager appears, click your external drive to choose it as the startup disk. Now, the computer will start up in Recovery Mode. After that, click Install macOS and hit Continue. The chosen macOS version will begin to install.
14. Install macOS from the bootable installer
If you’ve already created a bootable installer, you can use it to reinstall macOS at any time. To do so, follow these steps:
- To get started, be sure the bootable installer (USB flash drive) is connected to your Mac.
- Power down your macOS device. After that, hold down Option/Alt and press the Power button.
- Now, the startup device list window will show up featuring a yellow drive with the Install option below it. Click it and press Return.
- Next, select the Disk Utility and choose the drive under the Internal option.
- Next up, click Erase and give a suitable name to the drive.
- Make sure the Format is Mac OS Extended (Journaled) and the Scheme is GUID Partition Map.
- After that, click Erase and hit Done.
- Up next, click Disk Utility and choose Quit Disk Utility.
- Click Install macOS and hit Continue.
Now, go ahead with the instructions to install macOS options. Along the way, choose Macintosh HD as the installation disk and click Install.
After the process completes, you’ll have a new installation of macOS along with a Recovery partition.
Side Note: Now, you might see an alert. “This copy of the Install [macOS name] application can’t be verified. It may have been corrupted or tampered with during downloading.” Try adjusting the date and time in macOS to get rid of it.
Wrapping Up…
There you go! Hopefully, you’ve sorted out the macOS Recovery issues and reinstalled the latest macOS version or otherwise cleaned up your Mac.
Especially when dealing with an issue of such magnitude, it pays to have multiple alternatives so that you don’t get stuck, doesn’t it?
Did you find this guide helpful? Share your feedback with us in the comment section.
You may also like to read:


