FaceTime Like a Pro
Get our exclusive Ultimate FaceTime Guide 📚 — absolutely FREE when you sign up for our newsletter below.

FaceTime Like a Pro
Get our exclusive Ultimate FaceTime Guide 📚 — absolutely FREE when you sign up for our newsletter below.


From hidden iPhone settings to dirty speaker grills, here’s what could be making your AirPods quieter and how I fixed the issue with iOS 27.

 ByAnkur Thakur and Ava Biswas
If your AirPods sound quieter than they used to, don’t worry—you may not need to replace them just yet. I’ve used AirPods for years, and I’ve found that low volume can be caused by something as simple as blocked speaker grills, an iPhone setting, a poor fit, or one of the newer AirPods features that automatically adjusts volume.
In this guide, I’ll show you the easiest ways to make your AirPods louder on an iPhone running iOS 27. I’ll also cover the latest AirPods models and settings, so you can find the cause of the low volume and fix it without compromising your hearing.
Before changing any settings, I recommend checking these simple things.
Start playing music or a video and then:
On newer AirPods models, you may also be able to adjust the volume directly from the AirPods. For example, AirPods 5 with Wireless Charging case, AirPods Pro 2, and AirPods Pro 3 let you swipe up or down on the stem to change volume.
Put your AirPods in the charging case and check their battery level from your iPhone.
A very low battery isn’t normally the first thing I’d blame for low volume, but checking the charge level eliminates an easy variable before you start troubleshooting.
This is one of the first settings I’d check on iOS 27.
Your iPhone can automatically reduce headphone audio when it reaches the maximum decibel level you’ve configured.
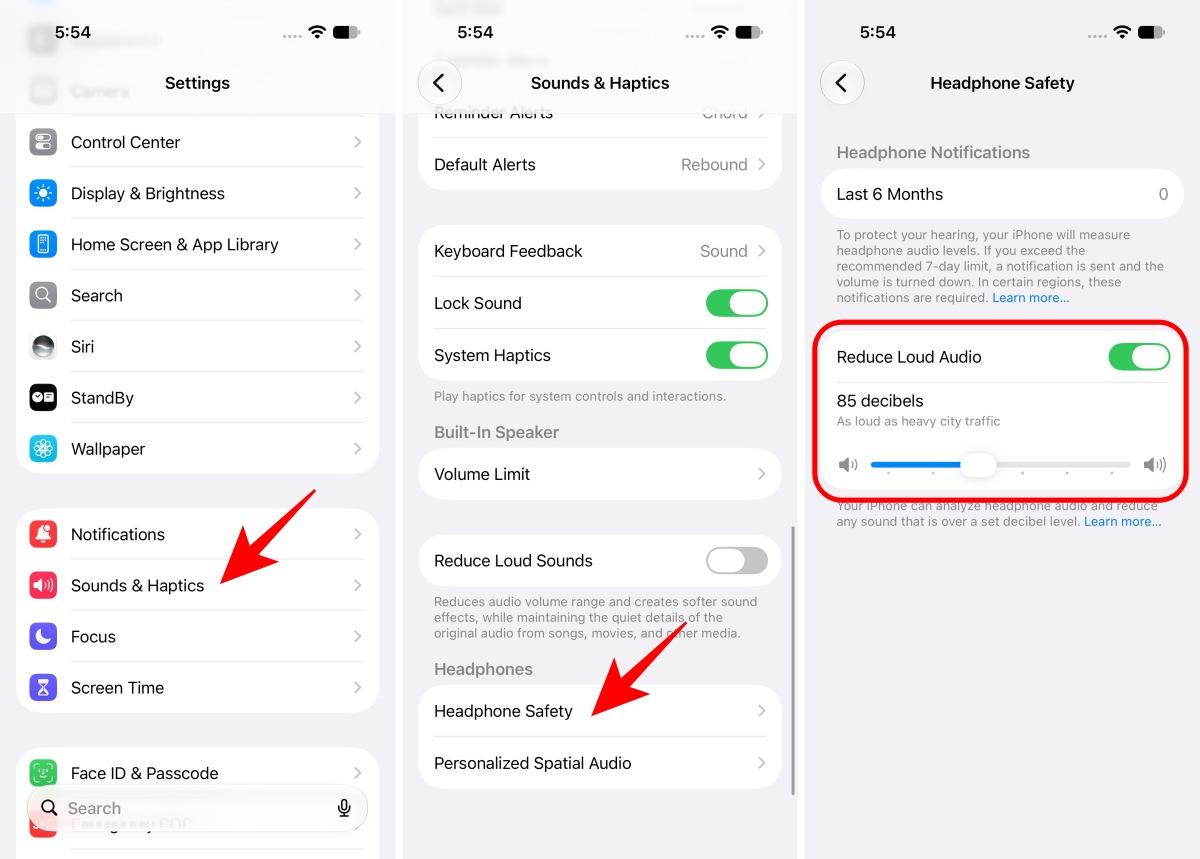
If you want your iPhone to stop reducing audio at your current limit, you can adjust this setting.
However, I don’t recommend disabling hearing-protection features simply to listen louder. Apple warns that listening to headphones at high volume for extended periods can damage your hearing. In some countries or regions, certain headphone-safety controls may also be required and cannot be disabled.
My recommendation: If your AirPods suddenly became quieter, check this setting first. If the limit is already appropriate, don’t simply remove it to force a higher volume.
If you have newer AirPods, this is one of the most important checks. Personalised Volume automatically adjusts your media volume based on your surroundings and your previous listening habits.
Apple currently supports Personalised Volume on models including AirPods 4 with ANC, AirPods 5, AirPods Pro 2, AirPods Pro 3, and AirPods Max 2.
If the volume suddenly feels normal after disabling it, you’ve found the reason iOS was changing your listening level.
Another newer feature that can make AirPods seem unusually quiet is Conversation Awareness.
When Conversation Awareness detects that you’re talking, it automatically lowers your media volume and makes voices around you easier to hear. Once the conversation ends, the media volume returns to its previous level.
This feature is available on newer AirPods models, including AirPods 4 with ANC, AirPods 5, AirPods Pro 2, AirPods Pro 3, and AirPods Max 2.
To check it:
Now play the same song again. If the volume no longer drops whenever you speak, Conversation Awareness was responsible.
If your AirPods only sound quiet when you’re listening to Apple Music, the AirPods themselves may not be the problem.
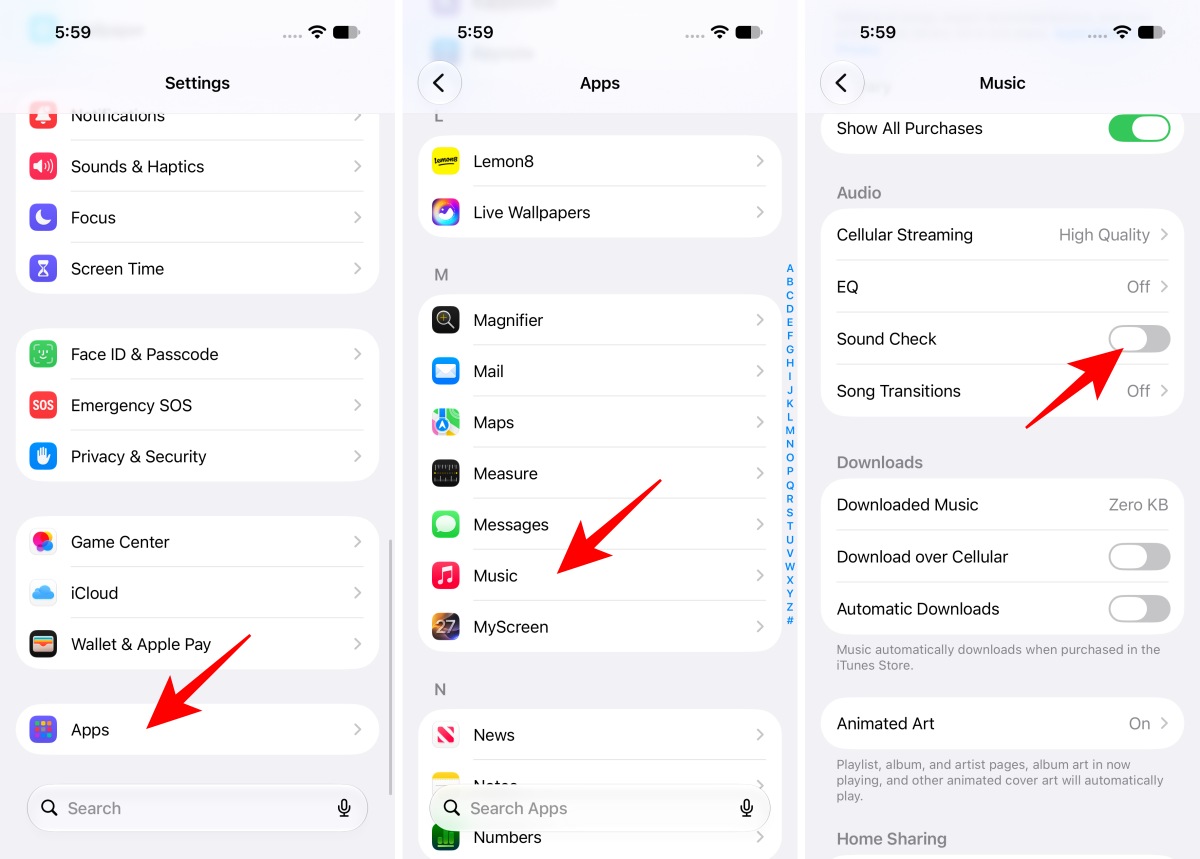
Sound Check normalises the loudness of different songs, so some tracks may sound quieter than others. I found the differences between stereo songs and Dolby Atmos tracks noticeable.
You can also go to the EQ option and set it to Off temporarily. If the problem disappears, your selected EQ profile was changing the sound signature rather than your AirPods failing.
If you have a newer supported AirPods model, there is another EQ setting that is separate from Apple Music’s EQ.
In iOS 27, you get a three-band custom equalizer on AirPods 4 or later, AirPods Pro 2 or later, and AirPods Max 2.
To check it:
Apple says custom EQ settings are stored on the AirPods and carry over to other paired devices. So, I use this method when my AirPods sound noticeably different across devices.
If your AirPods don’t sound loud or clear enough because certain frequencies are difficult for you to hear, Headphone Accommodations may be more useful than simply increasing the master volume.
Apple’s current compatibility list includes:
To set it up:
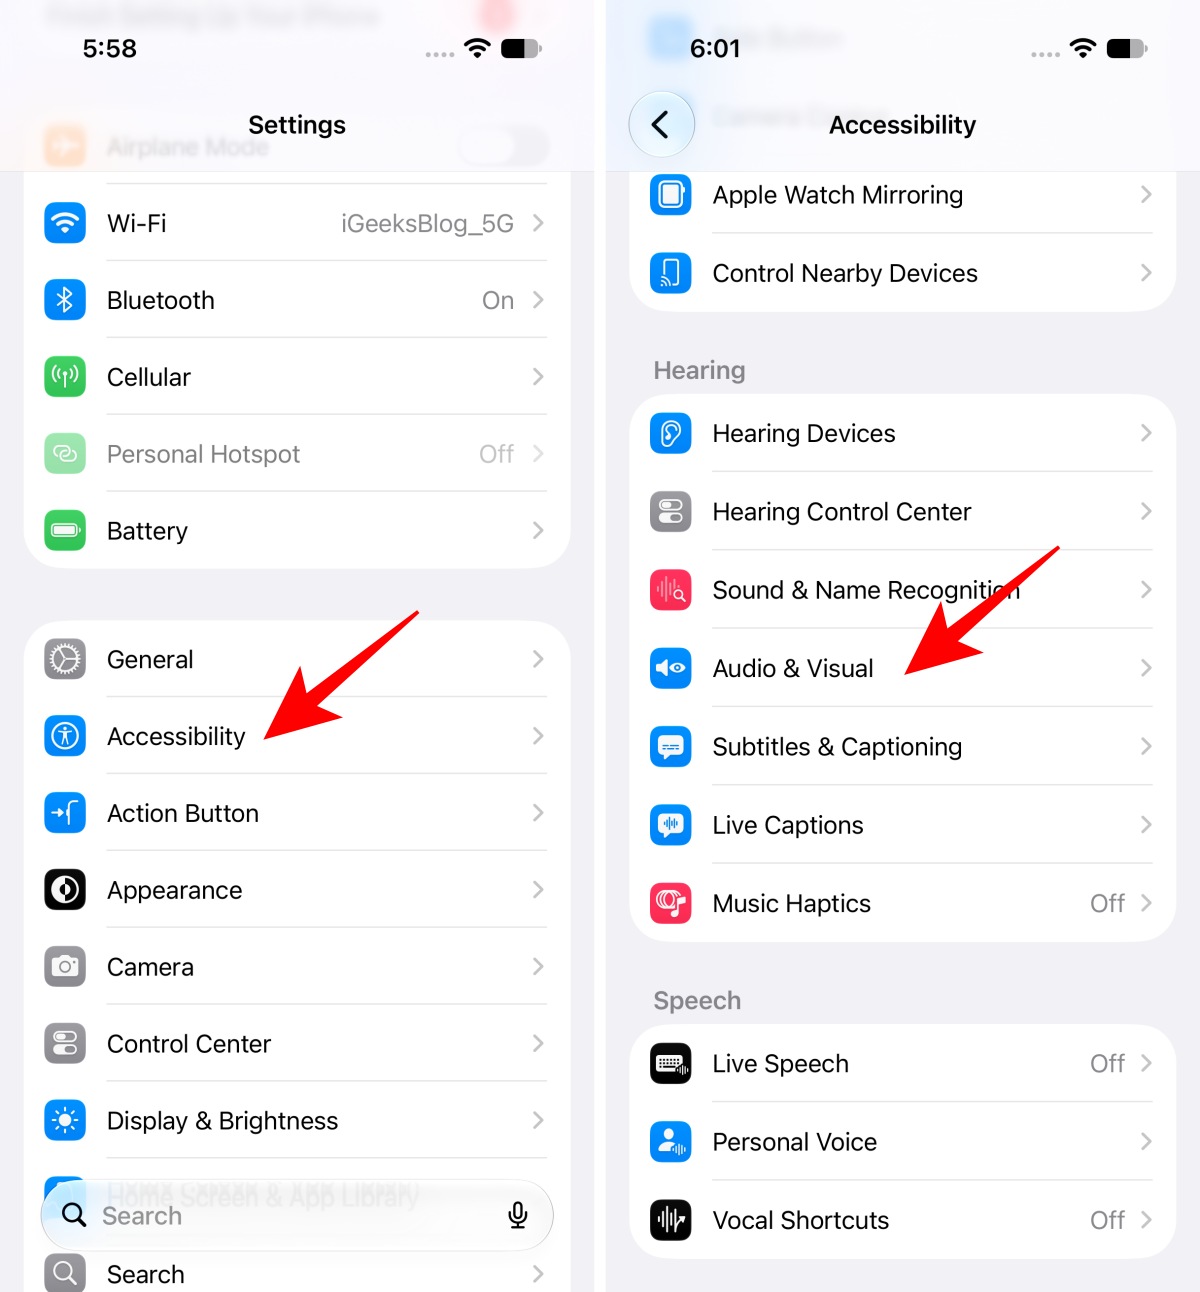
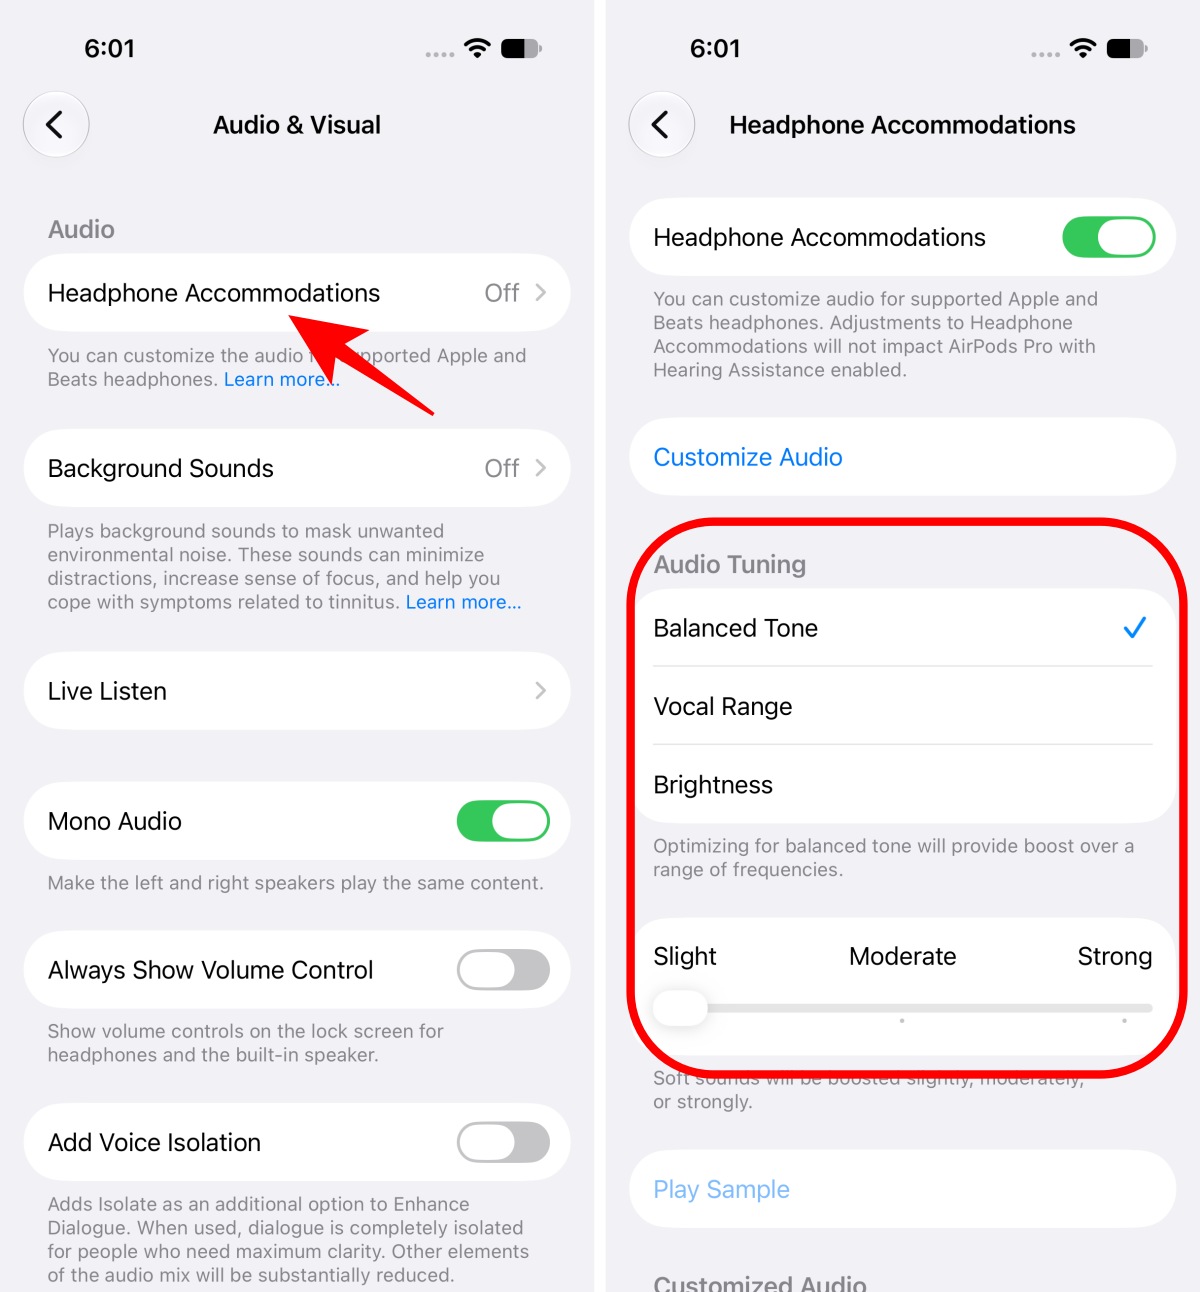
You can also manually adjust amplification, tone, Audio Tuning, and other audio characteristics, play a sample, and decide what sounds best to you.
However, this is not an actual “hack” that would amplify the volume of your AirPods. Rather, it will make the quiet frequencies audible, helping you hear the music, speech, and podcasts better without simply raising the overall volume.
If one AirPod sounds quieter than the other, don’t immediately reset the AirPods. The audio balance may have been moved accidentally.
Go to Settings > Accessibility > Audio & Visual and find Balance and make sure the slider is centred. If the balance is heavily shifted to one side, move it back to the centre and test both AirPods again.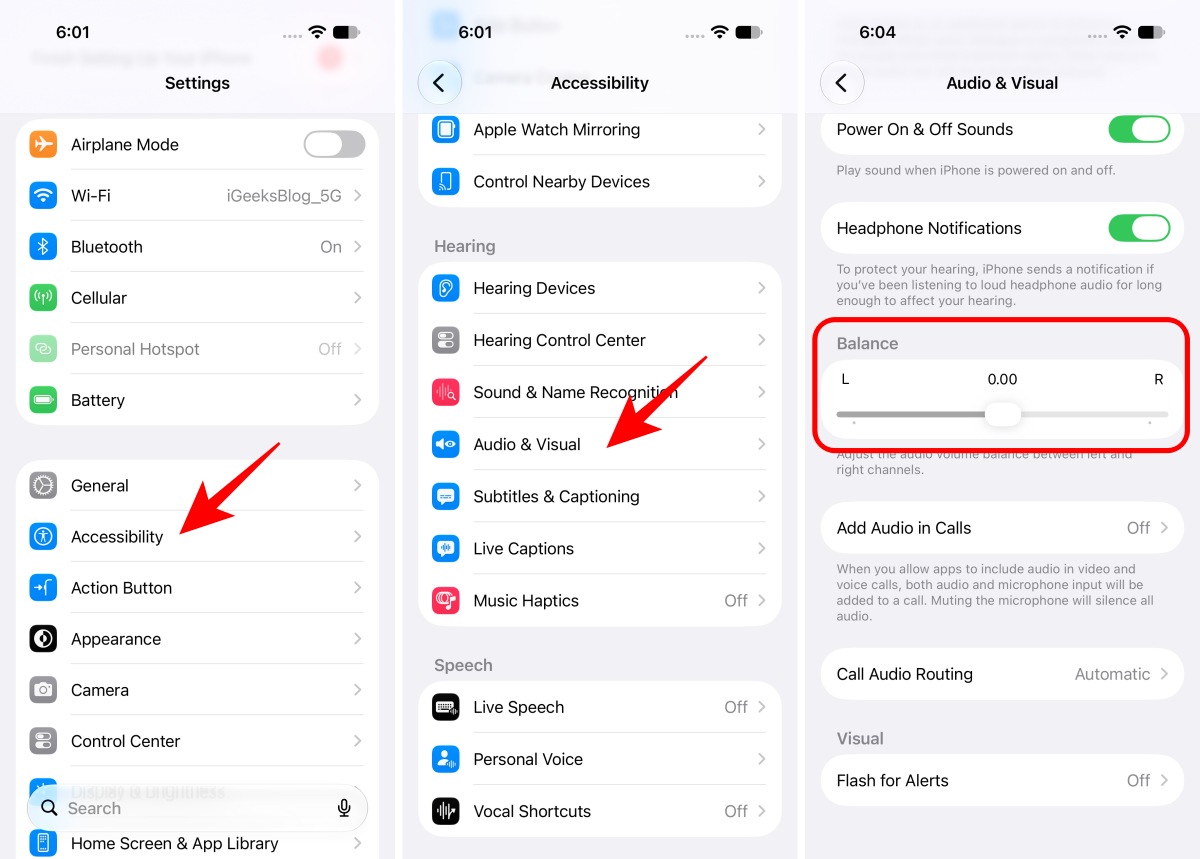
Observation: For some local tracks on my iPhone, enabling Mono Audio seemed to increase the volume, though the experience may not be delightful.
As I have tested different AirPods, I have noticed that the physical fit of the AirPods Pro can make a surprisingly big difference in perceived volume and bass.
A poor seal lets outside sound leak in, making your music seem quieter even though the AirPods are producing the same volume.
For AirPods Pro 1 and Pro 2, Apple provides an Ear Tip Fit Test and AirPods Pro 3 has a newer Acoustic Seal Test.
To check:
If the test indicates a poor seal, try another ear-tip size.
Apple specifically recommends using the ear tips designed for your AirPods Pro model because the tip design differs between generations.
There is no universal principle that turning off ANC will automatically increase headphone volume. In a noisy environment, Active Noise Cancellation can actually make music easier to hear because it reduces the competing background noise.
Instead, try the available listening modes and see which one works best for your environment.
For supported models:
On supported newer AirPods, Adaptive Audio automatically balances noise cancellation and transparency according to your surroundings.
If you’re in a loud environment, I’d generally try ANC before increasing the volume dramatically.
Newer AirPods have additional hearing-protection features that can affect how much environmental sound you hear.
On compatible AirPods, Loud Sound Reduction can reduce exposure to loud environmental noise while using Transparency or Adaptive Audio. Apple notes that this feature is associated with Hearing Protection on AirPods Pro 2 and AirPods Pro 3.
If your issue is that outside sounds are overpowering your music, do not rush to turn off the protection feature. Instead, try switching to Noise Cancellation in a safe environment and see whether the perceived loudness improves.
I would prioritise protecting your hearing over forcing the AirPods to play louder.
If you’ve been using your AirPods for years, cleaning the mesh is worth doing before you assume the hardware has degraded.
Earwax, dust, and debris can partially block the acoustic mesh and reduce perceived volume. Apple also notes that debris can affect sound and noise-control performance.
I would especially check this if:
However, be careful when cleaning. I would remove the old recommendation to use a toothpick. Don’t poke the speaker mesh with a sharp object or use abrasive materials. Get a dedicated cleaning kit for your AirPods.
Follow the correct cleaning procedure according to your particular model and keep liquids, cleaning products, and compressed air away from the acoustic openings.
Sometimes your AirPods aren’t actually producing low volume—the content itself is quiet.
This can happen with:
Try playing the same AirPods with several different sources.
For example, compare Apple Music, YouTube, a locally stored video, and a different streaming service. If only one app or file sounds quiet, the AirPods probably aren’t the problem.
AirPods receive firmware updates that can include bug fixes and improvements.
You don’t manually install these updates from a normal Software Update screen. Apple delivers them automatically while your AirPods are charging and within Bluetooth range of an iPhone, iPad, or Mac connected to Wi-Fi.
Now, compare the version with the recently released AirPods firmware update.
If you’ve tried the settings above and your AirPods still sound unusually quiet, resetting them is a reasonable next step.
First, forget the AirPods:
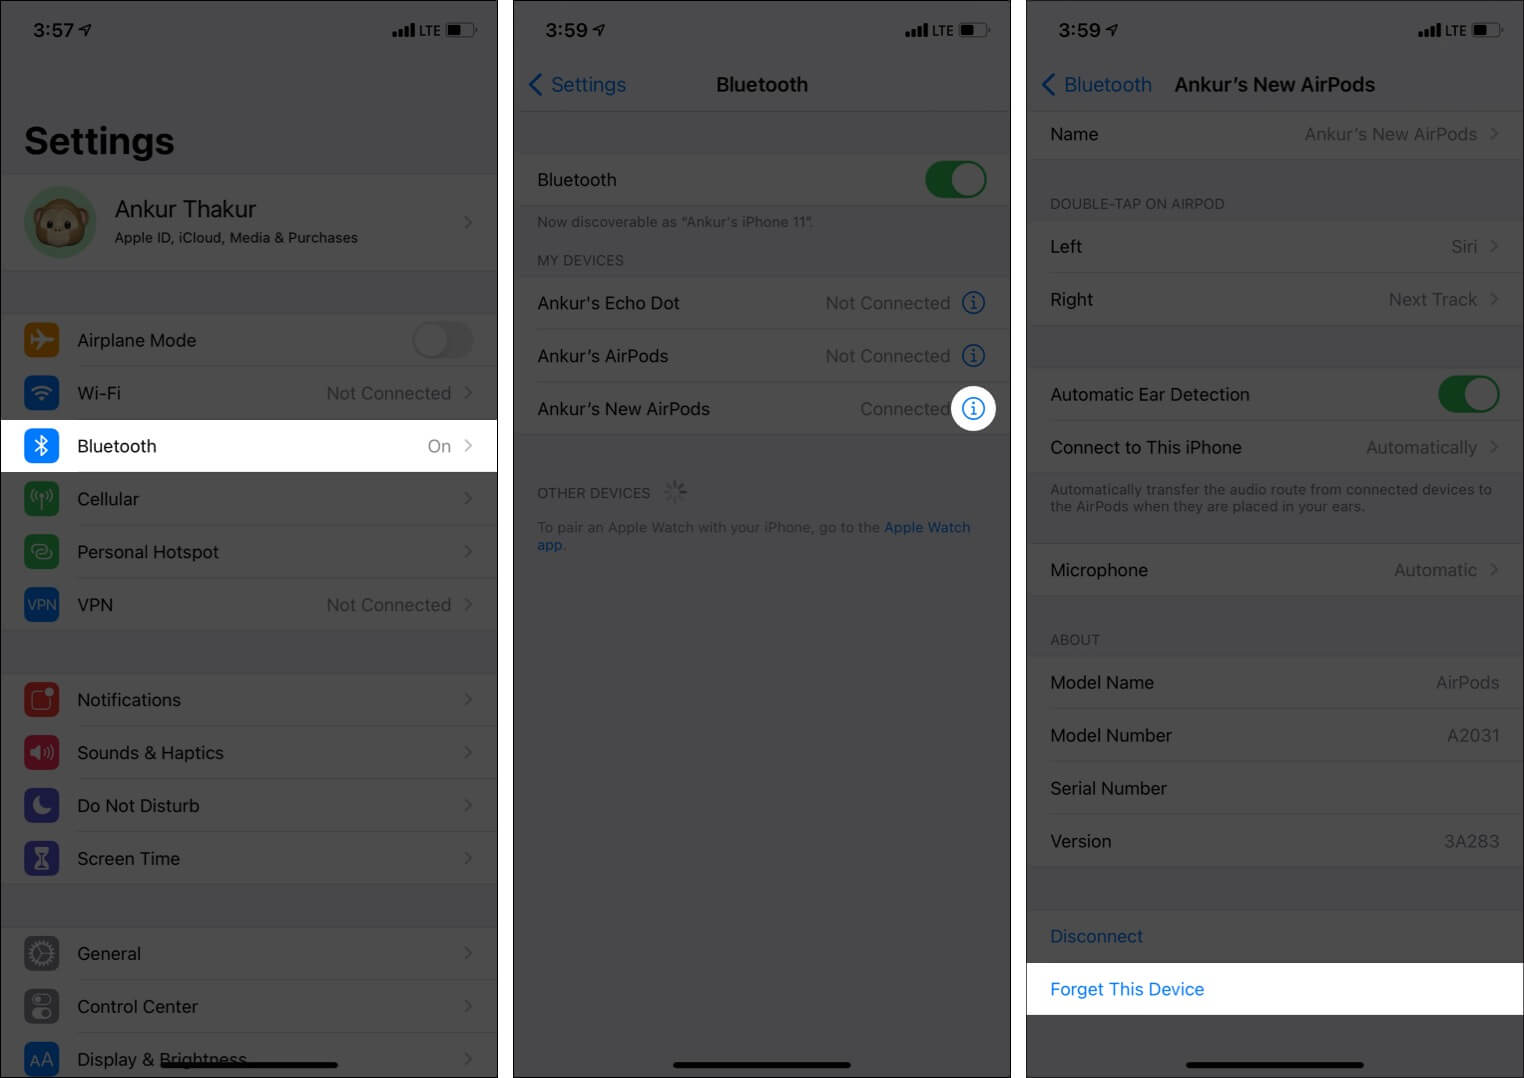
Then reset the AirPods according to their model.
The reset procedure is different because these newer charging cases don’t use the same physical setup-button workflow.
Put the AirPods in the case, close the lid, wait 30 seconds, then open the lid and follow Apple’s current reset instructions for your model.
Finally, re-pair your AirPods to your iPhone and check the sound again.
If you’ve owned the same AirPods for several years, physical wear can absolutely become part of the problem. But I wouldn’t automatically say that every pair loses volume after two years.
A gradual reduction in perceived volume can have several causes:
If cleaning and troubleshooting don’t restore the sound, the AirPods may need service rather than another software tweak.
If your AirPods are several years old and none of the troubleshooting steps above make a meaningful difference, replacement may eventually make more sense than continuing to chase software settings.
But before spending money on a new pair, I’d do these three things first:
That last test is particularly useful.
If the same AirPods sound quiet on another device, the problem is more likely to be with the AirPods themselves. If they sound normal on another device, I’d look at the original iPhone’s settings instead.
When AirPods sound quieter than expected, I wouldn’t immediately crank the volume to 100% or assume they’re dying.
With iOS 27 and the latest AirPods models, more factors now control your listening experience. Personalised Volume can automatically adjust media, Conversation Awareness can temporarily lower it, Headphone Safety can limit loud audio, and custom EQ or Headphone Accommodations can change how you perceive certain frequencies.
And if you’re tempted to solve the problem simply by listening louder, I’d resist that temptation. A clearer, better-fitting AirPod at a moderate volume is much better than constantly pushing the volume slider toward maximum.
Did you successfully make your AirPods sound louder and fix volume issues?
Some related posts you will find useful: