FaceTime Like a Pro
Get our exclusive Ultimate FaceTime Guide 📚 — absolutely FREE when you sign up for our newsletter below.

FaceTime Like a Pro
Get our exclusive Ultimate FaceTime Guide 📚 — absolutely FREE when you sign up for our newsletter below.


Everything you need to know before leaving Android behind and moving your data to an iPhone.
I’ll be honest: moving from Android to iPhone used to be the part of the switch I dreaded most. The iPhone itself is easy to set up. The headache is everything sitting on the old Android phone, including thousands of photos, years of WhatsApp conversations, contacts, messages, files, and the phone number you don’t want to lose.
In 2026, however, this issue is much less troublesome. Apple still recommends Move to iOS, but there is now another option: compatible Android phones running Android 17 or later can transfer data to an iPhone without installing the Move to iOS app. Apple also supports a direct USB-C connection for faster transfers.
Here’s exactly how I move data from Android to iPhone.
Before starting, it helps to know what Apple can actually move. Otherwise, you may finish the transfer and wonder where your music collection or PDF files went.
Apple says the supported transfer can include:
That covers most of the data I would consider important when changing phones. But there are some notable exceptions.
Apple specifically says music, books, and PDFs need to be moved manually. Apps that aren’t available on the App Store also won’t magically appear on your iPhone.
So don’t think of this as cloning your Android phone onto an iPhone. It’s better to think of it as moving the supported data into Apple’s ecosystem and then rebuilding the rest.
This is the part I wouldn’t rush.
Apple recommends turning on Wi-Fi and plugging both phones into power before beginning. You should also make sure everything you’re transferring, including data stored on an external Micro SD card, will fit on the new iPhone.
I would check these things first:
Tip: If WhatsApp contains years of photos and videos, don’t underestimate how much space it can consume.
Yes, if you have a compatible cable.
Apple says you can directly connect an Android phone and an iPhone with a USB-C cable for faster transfer. That’s my preferred approach when moving a large amount of data.
A wireless transfer is convenient, but when you’re moving years of photos, videos, and messages, I would rather have the two phones physically connected than depend entirely on a wireless connection.
One small warning: Apple notes that when you connect the phones by cable, Android may show a USB-related pop-up, and you might need to adjust the USB settings before Move to iOS can start.
This remains the most universal official method. If your Android device does not support Apple’s new app-free transfer system, then this is how I’d do it.
Turn on the new iPhone and place it near your Android phone, and follow the setup instructions.
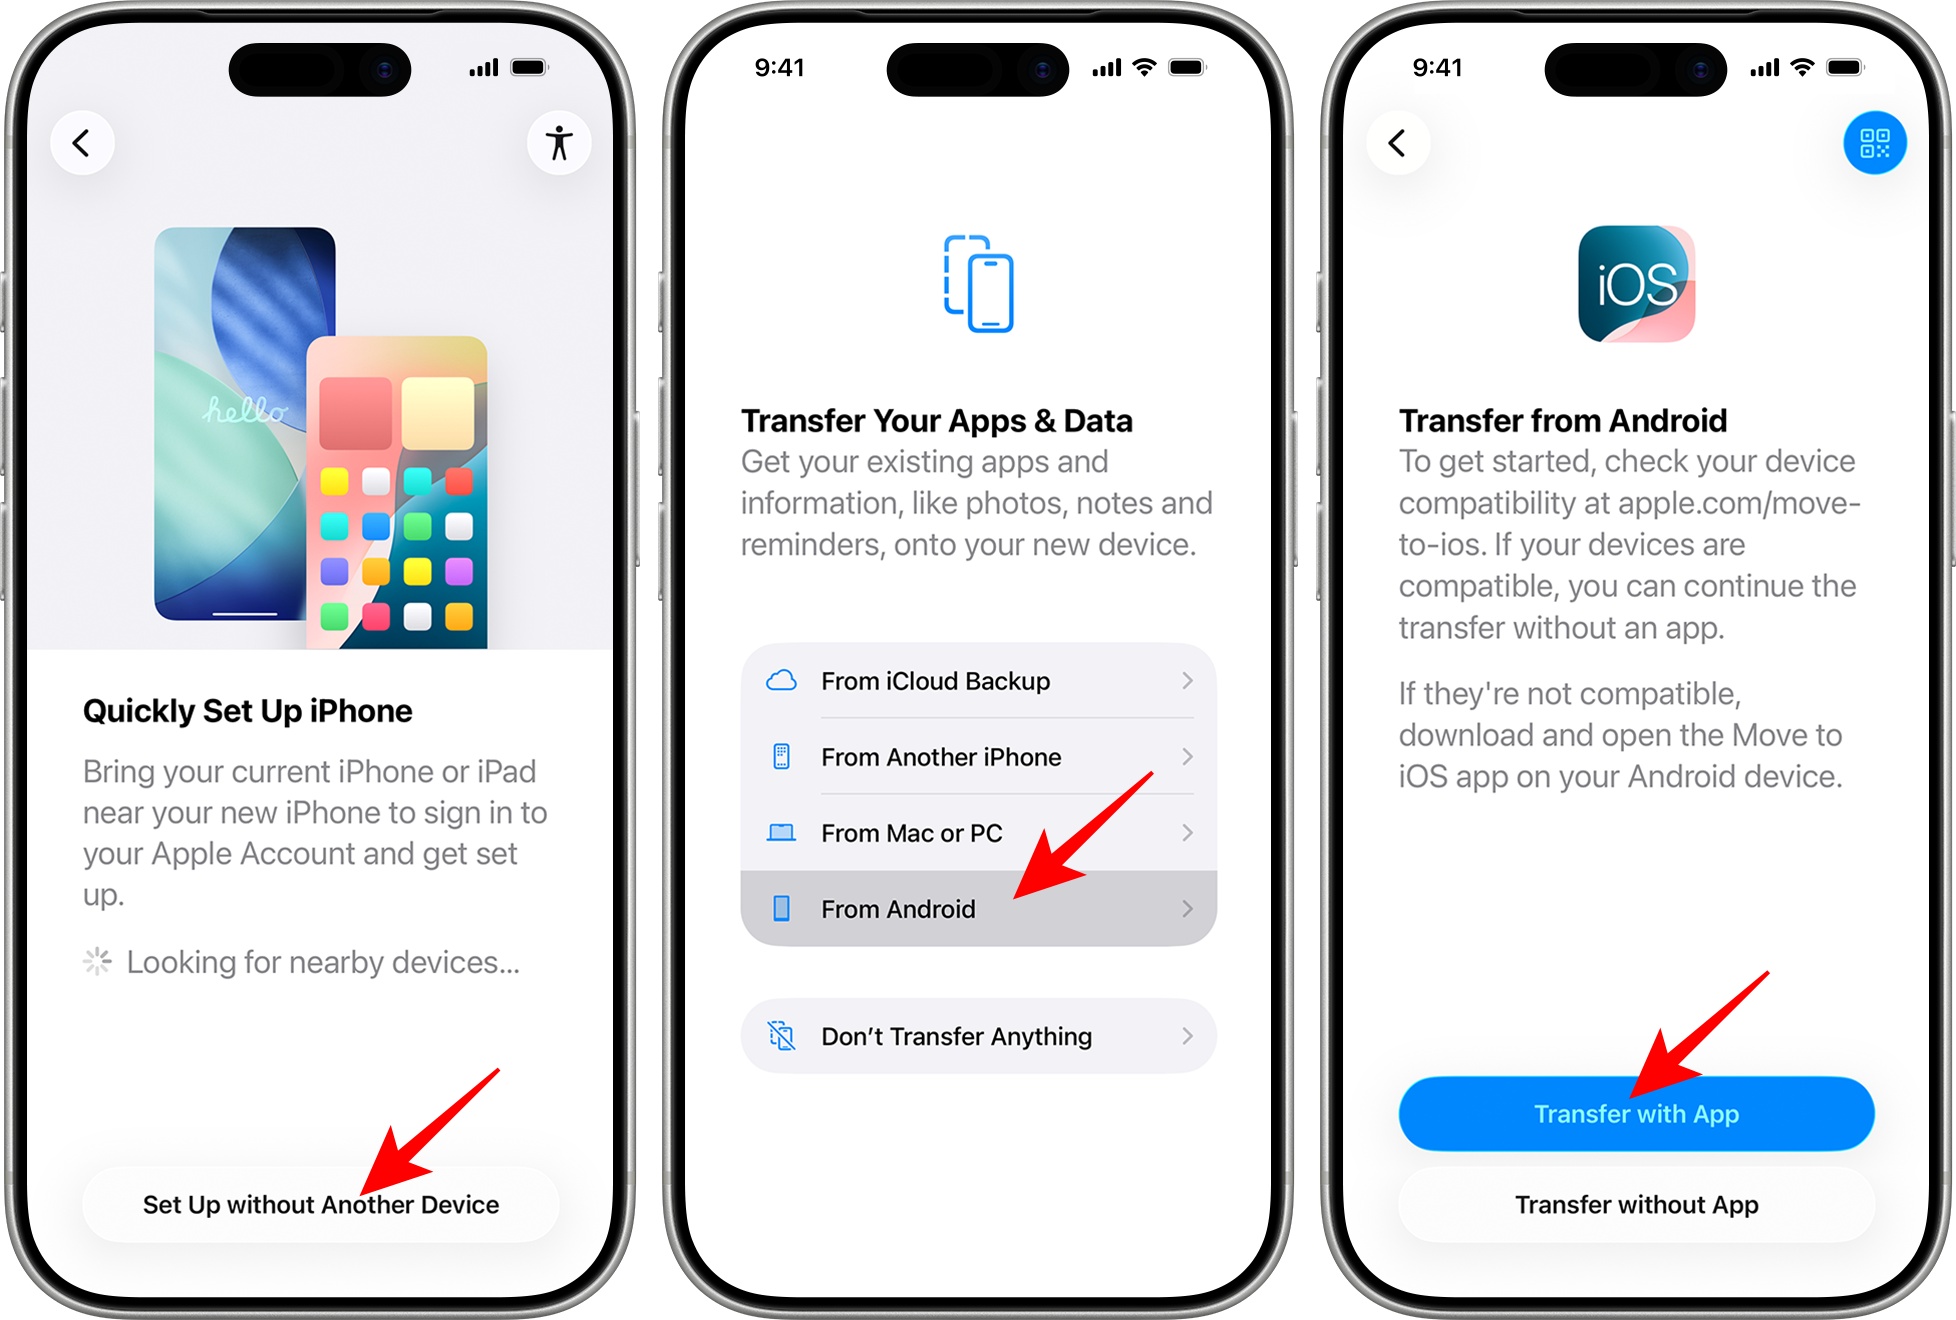
Note: If you’ve already completed iPhone setup, you need to erase the iPhone and start again to use Move to iOS. If you don’t want to erase it, you’ll need to move your content manually instead.
On your Android phone, open the Move to iOS app.
I didn’t have it installed. But don’t worry, Apple provides a QR code shortcut on the new iPhone that takes you to the Google Play download page.
Once downloaded, launch the Move to iOS app and follow the next steps:
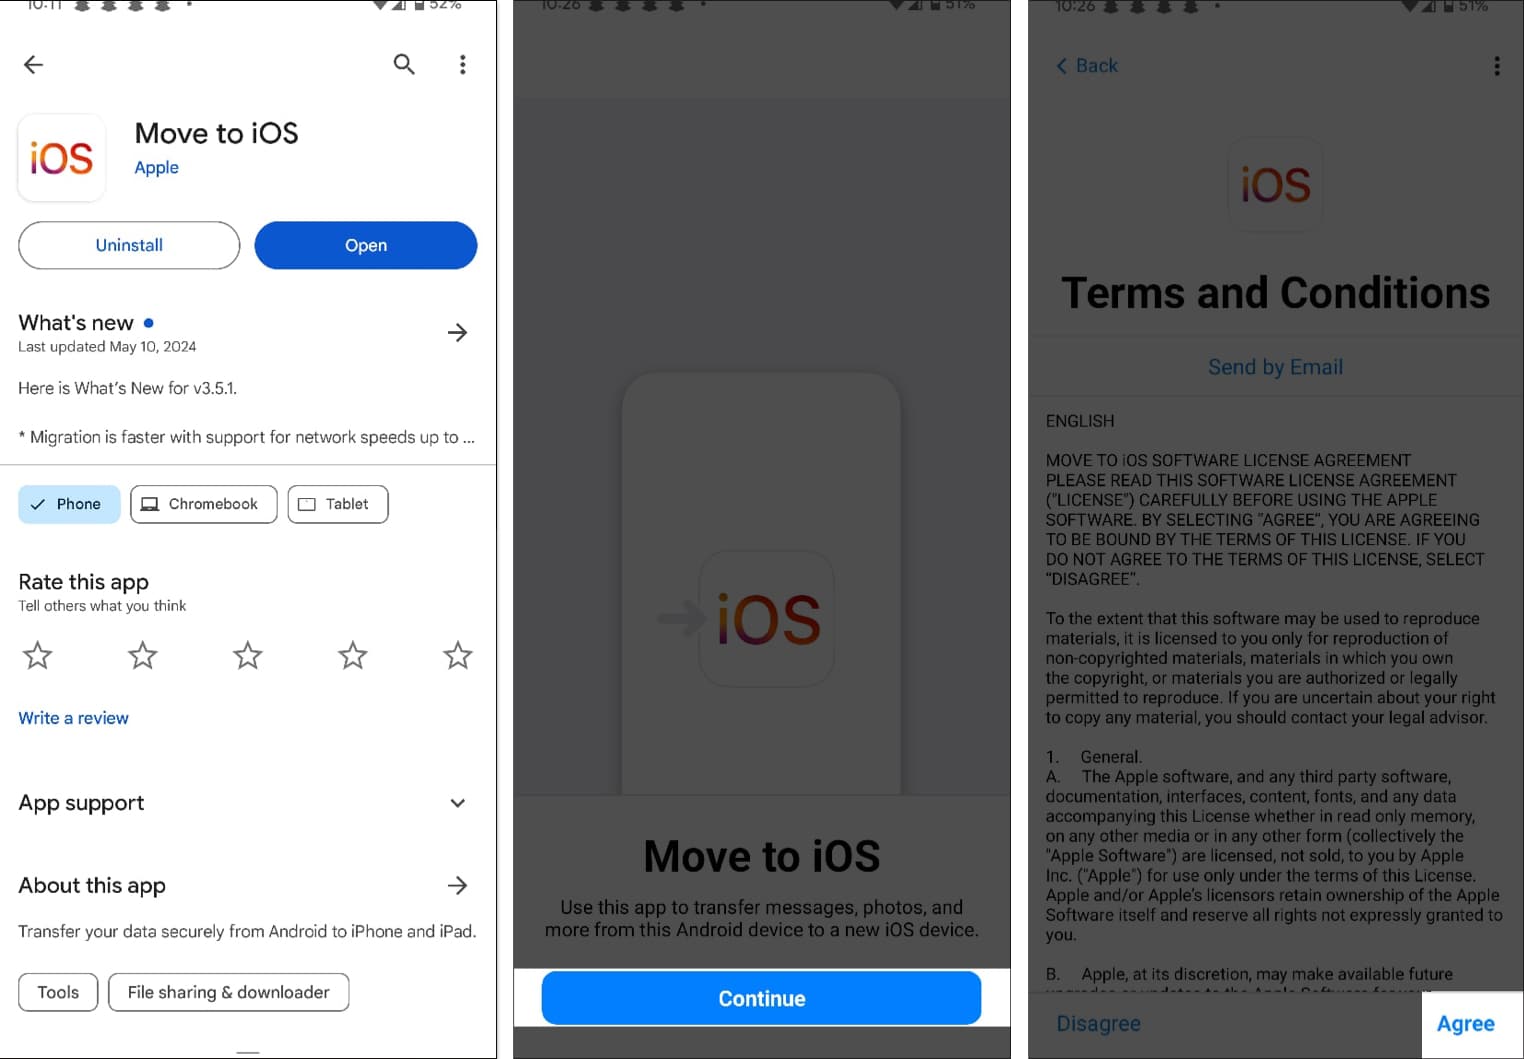
If you’re using a USB-C cable, you may also see a USB settings prompt.
On your iPhone, tap Continue when you reach the Move from Android screen. The iPhone will display a six-digit or ten-digit code.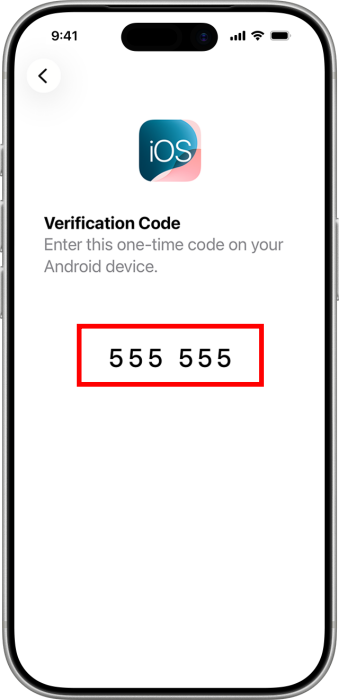
Enter that code into the Android phone. The iPhone essentially creates a temporary connection so the two phones can communicate.
The iPhone creates a temporary Wi-Fi network.
When Android asks whether you want to join it, tap Connect.
Wait for the Transfer Data screen to appear.
If Android displays a warning about a weak internet connection, don’t panic. Apple specifically says you can ignore that alert during this process.
Now you’ll see the data that can be moved.
Select what you want to transfer and tap Continue. I have already shared the data types you can move from Android and iPhone.
Now, leave both phones alone until the iPhone’s loading bar finishes.
Even if the Android phone says the transfer is complete, I always wait until the progress bar on the iPhone has finished. Keep the phones close together and plugged in.
I would not:
Apple specifically warns that using another app or receiving a call on Android before the transfer finishes can prevent the content from transferring.
Once the progress bar completes, tap Done on your Android device.
Also, tap Continue on your iOS device and follow the on-screen instructions to sign in to your Apple Account and continue setting up your device.
You can activate your phone number and SIM or eSIM on the iPhone during the move. Depending on your carrier, you may be directed to the carrier’s website to complete activation.
Apple has upgraded the Move to iOS app to make the transfer seamless.
If you have a supported Android device running a compatible version of Android 17 or later, you can transfer data without installing Move to iOS. Device-manufacturer support is required, so Android 17 alone doesn’t guarantee that every phone supports the feature.
If your phone supports it, I’d choose this method first.
On the new iPhone:
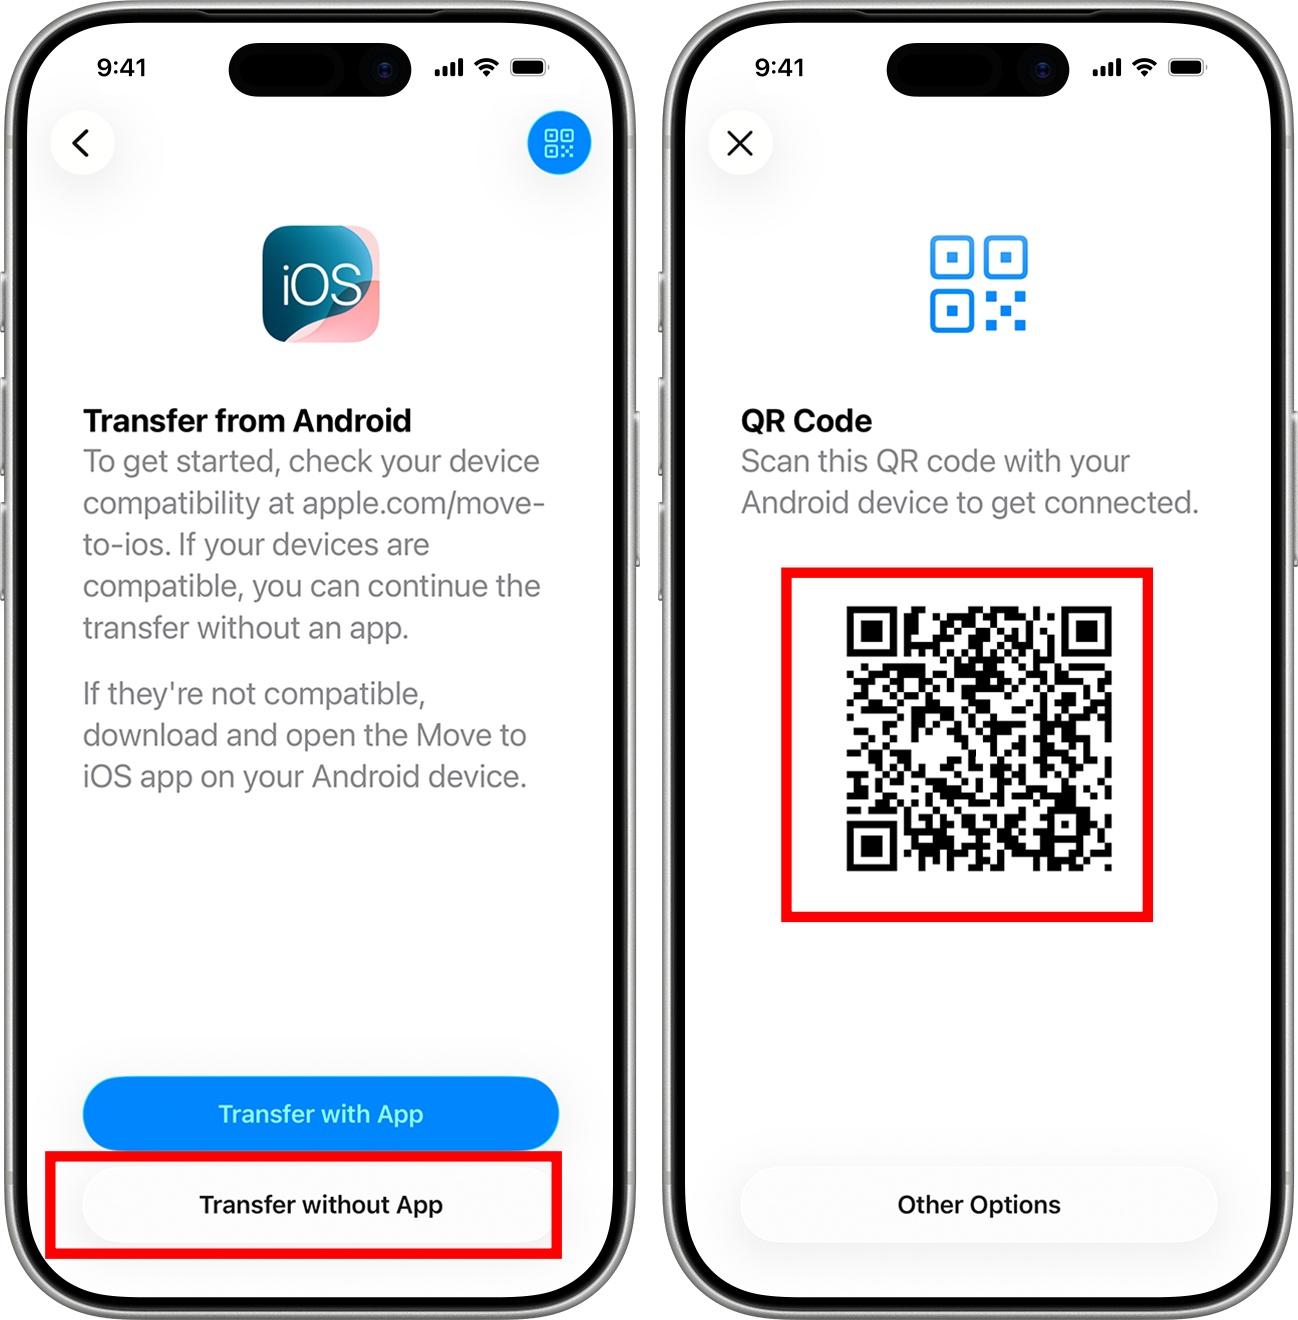
The process is as simple as that. Check if everything has been moved successfully before factory resetting your Android.
The best part is that I can quickly transfer my eSIM to the new iPhone with the app-free method. After the data transfer, select the phone number on your Android device and tap Transfer. Once the eSIM transfer is complete, continue setting up the iPhone.
However, this depends on the device and carrier, so I wouldn’t assume every Android-to-iPhone switch will have a one-tap eSIM experience. You may need to manually activate the number in that case.
You aren’t stuck. Apple provides a manual pairing method for the app-free transfer.
On the iPhone, when the QR code appears, tap Other Options.
Then on Android, follow these steps:
Note: If your Android phone doesn’t provide a place to enter the session ID and pairing code, you may need to contact the device manufacturer.
For many Android users, this is the part that matters most.
The good news is that Apple’s Move to iOS process supports transferring WhatsApp messages and media. When you reach the content-selection screen during the transfer, make sure WhatsApp data is included.
After the transfer finishes, I recommend opening WhatsApp on the iPhone and checking:
Don’t wipe the Android phone immediately. I would keep the old phone untouched until I’ve checked the data I care about most.
This is where Android-to-iPhone migration behaves differently from moving between two Android phones. Your Android apps don’t simply get copied to iOS.
As per my testing, when a free app is available on both Google Play and the App Store and supports the transfer feature, it moves to iPhone smoothly. Once the transfer is finished, you can download those matched apps from the App Store.
For everything else, you need to open the App Store, download the iPhone version manually, and sign back in.
And if an Android app isn’t available for iPhone, you’ll need to find an alternative.
This is where I think Apple’s automatic transfer deserves an asterisk.
It doesn’t move everything. You need to send music, books, and PDFs manually.
For files, PDFs, and ePub books stored locally, you can use a computer as an intermediate step. Connect your Android phone to a computer and copy the files from the Documents folder. Then connect your iPhone and, on Mac, drag them into the Books app or sync via Finder. On Windows, use the Apple Devices app to sync them.
Here’s the catch that can save you a lot of frustration: Move to iOS is designed to work during iPhone setup.
If you’ve already finished setting up the iPhone, you need to erase the iPhone and start over to use the Move to iOS transfer. If you don’t want to erase the iPhone, you’ll have to manually move the content, contacts, text messages, call history, and more.
My advice is simple: Don’t spend an hour customizing a brand-new iPhone before deciding how you’re going to transfer your Android data. Choose your transfer method first.
Move to iOS is convenient, but it isn’t immune to problems. If the transfer fails, I’d go through these fixes in this order. From checking your connection and restarting both phones to ensuring enough storage and updating the software, these simple steps can often get the transfer working again.
Don’t switch apps on Android, answer calls or let another process interrupt the transfer.
Apple specifically says the Move to iOS app should remain on screen until the transfer finishes.
I recommend turning off the Android phone’s cellular data connection, as it might have an unstable speed, and trying the transfer again if you’re having problems.
Some Android phones have features that automatically switch networks or optimize connections.
Apple specifically mentions settings such as Smart Network Switch and Sprint Connections Optimizer as examples of settings that can interfere with the transfer.
If your internet connection is still slow or experiencing hiccups, forget the connected Wi-Fi network on your Android device, reconnect to it, and try one more time.
It’s boring advice, but I trust it the most. It removes the cache and refreshes the system.
Restart the Android and iPhone, then start the transfer again. Apple lists restarting both devices among its recommended troubleshooting steps.
This is the problem I would take seriously before starting the transfer.
Sometimes, you may end up with only some content transferred, as the iPhone may appear full even though the transfer didn’t actually finish. In that situation, erase the iPhone, restart the transfer, and select content that fits within the iPhone’s available storage.
So check storage first. If your Android phone has 180GB of photos, videos, and files, moving to a 128GB iPhone won’t magically solve the math.
Switching from Android to iPhone doesn’t have to be complicated. With Move to iOS, Apple’s new Transfer without App option for supported Android 17+ devices, and USB-C transfers, I can move most of my important data without starting from scratch.
I’d recommend checking my storage first, keeping both phones plugged in, and making sure my photos, contacts, messages, WhatsApp chats, and eSIM have transferred successfully. Music, books, and PDFs may still need to be moved manually.
Once everything looks good, you can finally say goodbye to your old Android phone and enjoy your new iPhone without worrying about leaving important data behind.