
iGeeksBlog
Update Apple ID Settings stuck on iPhone? 10 Ways to fix it!
ByIdowu
Explore this post with:
That frequent popup on your iPhone asking you to Update Apple ID Settings makes it feel like you’ve contracted malware. But that’s far from being the culprit. An incomplete Apple ID setting or other software issues might put your iPhone in the Update Apple ID Settings mode.
Ever wondered why your iPhone is having trouble updating Apple ID settings, and more importantly, how to fix it? Well, you’re in luck! In this article, we’ll break down the reasons behind the “update Apple ID settings stuck” issue and walk you through 10 simple fixes to get it sorted.
Possible causes of the “Update Apple ID settings stuck” issue
- Unstable Internet Connection: If your internet is acting up, it can put a pause on the Apple ID settings update.
- Outdated iOS Version or Bugs: An older iOS version or some pesky bugs in your system could be preventing the smooth update.
- Incomplete Apple ID Information: Missing details, especially in areas like Payment & Shipping, could be the culprit.
- Password Changes: If you recently changed your Apple ID password on a different iPhone, it might be causing the holdup.
- Hardware Glitches: Sometimes, hardware issues might also be a factor in the “update Apple ID settings stuck” problem.
Don’t worry, though! We’ve got you covered with solutions for each of these issues. Let’s get your Apple ID settings updated and running smoothly again!
- Restart your iPhone
- Ensure you’re logged in to your Apple ID
- Log out and sign in back to iCloud
- Check the network connection
- Update Apple ID information
- Reset Face ID or Touch ID
- Reset your Apple ID password
- Check Apple Server Status
- Check for iOS updates
- Reset your iPhone
1. Restart your iPhone
The “Update Apple ID Settings” notification may be due to a minor software glitch on your phone. Restarting the iPhone is a proven way to get it sorted, as the phone reboots properly and self-resolves most minor glitches.

2. Ensure you’re logged in to your Apple ID
If you recently updated or reset your iPhone, Apple might automatically log you out of your iCloud account. In this situation, trying to use an app or a phone functionality, which requires an Apple ID authentication, might be causing the “Update Apple ID settings stuck” issue.
Also, if you switch Apple IDs often, ensure you’re logged in with the correct account.
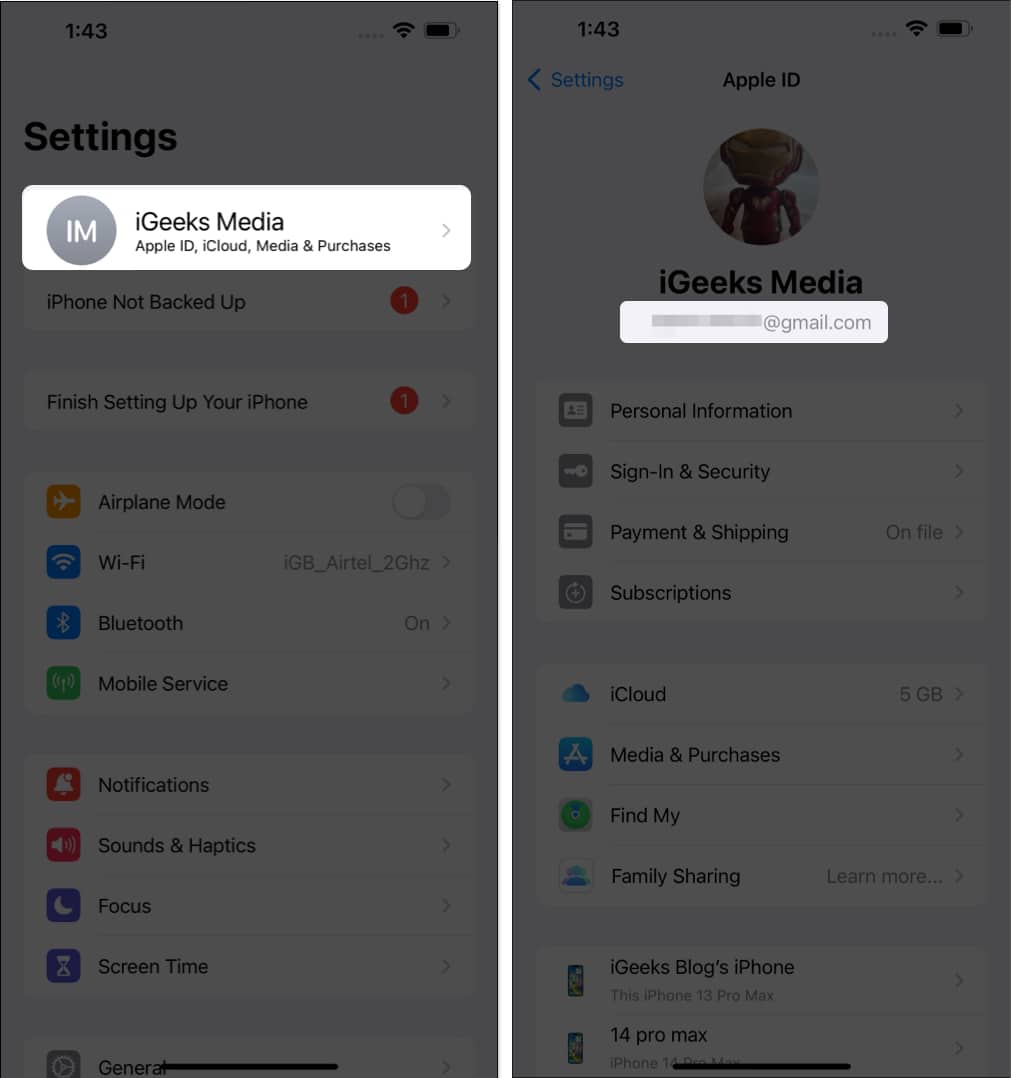
- Open Settings → Tap your name.
- Check your registered email written below your name.

3. Log out and sign in back to iCloud
You may also try logging out and back into your iCloud account to remove the stuck notification.
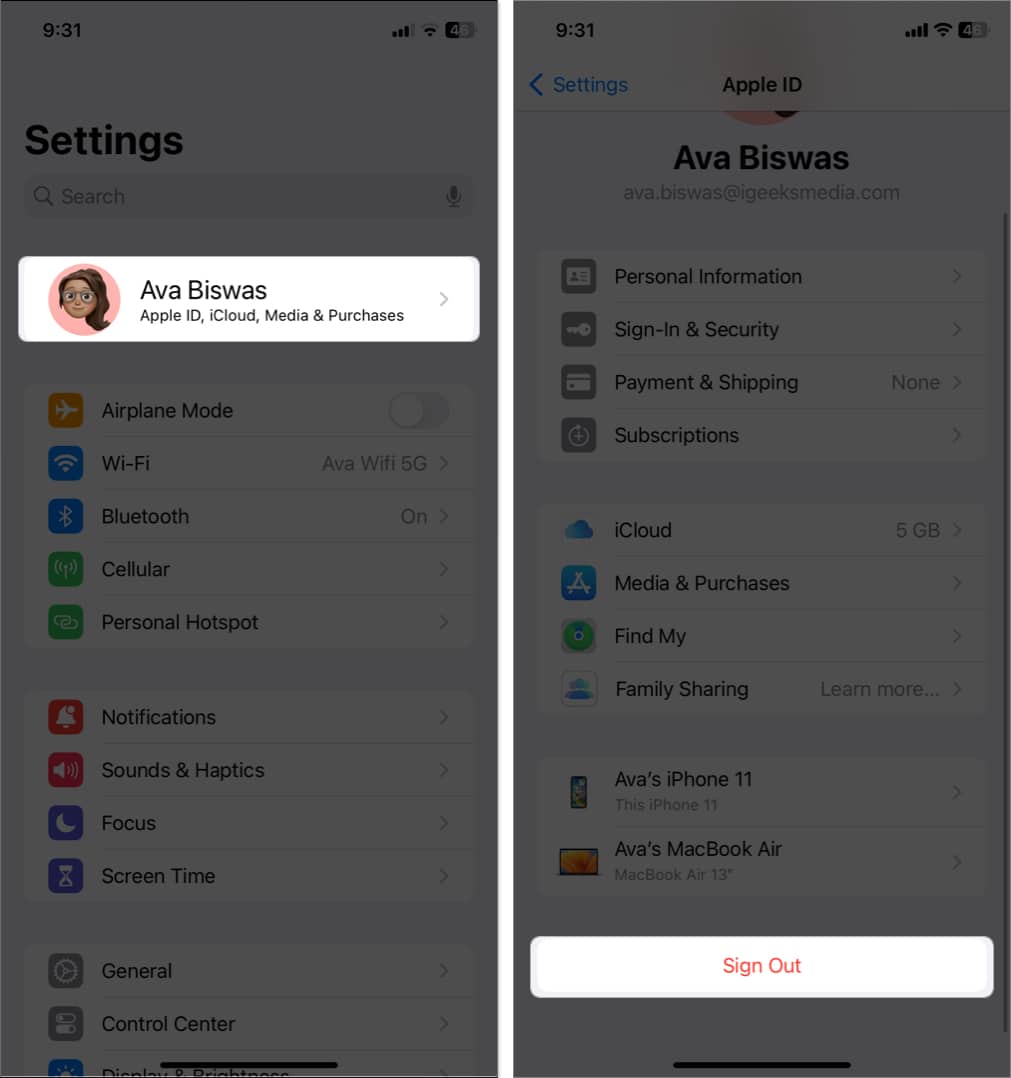
- Open Settings → Tap your name.
- Select Sign Out.
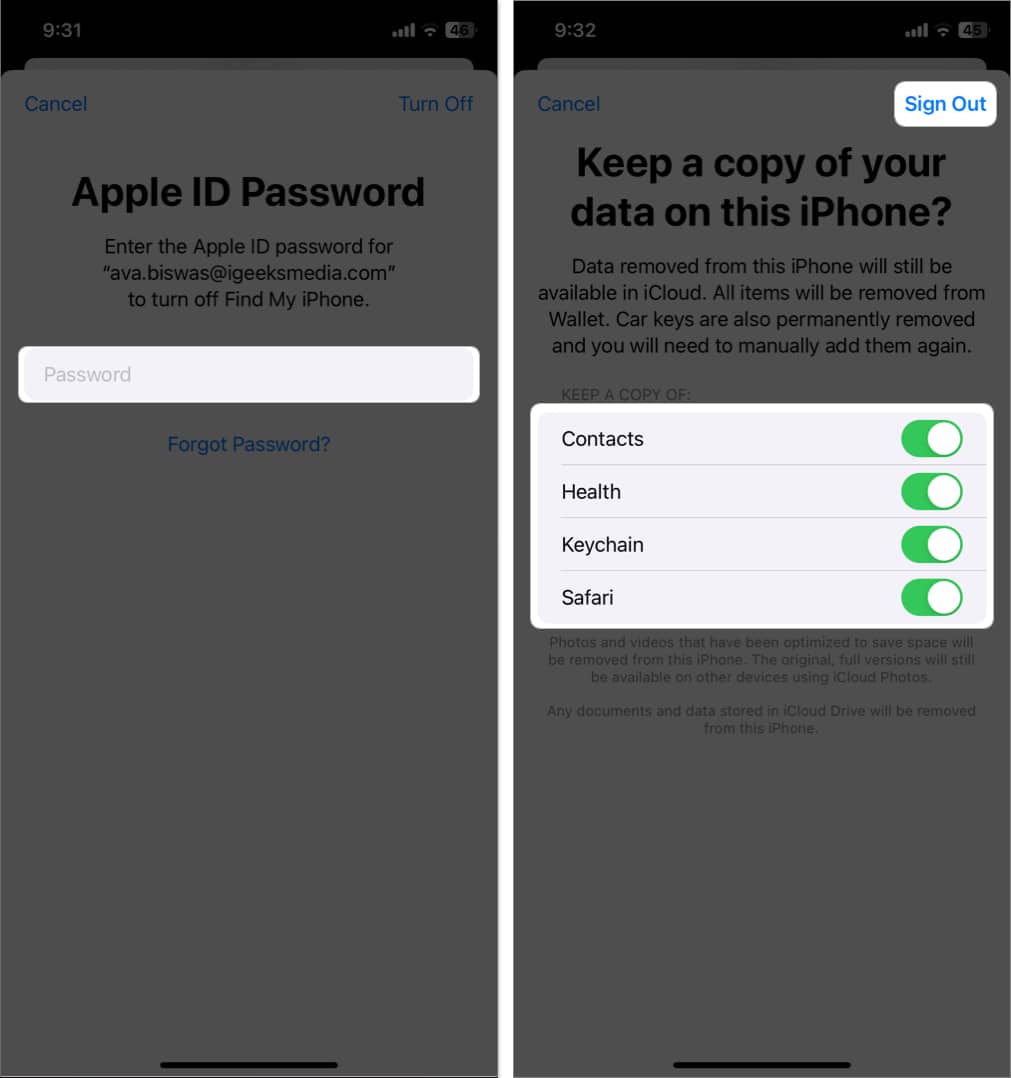
- Enter your Apple ID password → Hit the return key.
- Toggle on Contacts, Health, Keychain, Safari → Tap Sign Out twice.
- Go to Settings again → Tap Sign in to your iPhone.
- Select Sign in Manually.
- Enter your Apple ID, password, and iPhone passcode when prompted.
- Tap Merge.


4. Check the network connection
Since Apple checks your Apple ID with existing records, you need a good internet connection to authenticate your Identity on iCloud. If your network connection is poor, your iPhone might keep throwing the notification until it discovers an internet connection.
Switching between your mobile data and Wi-Fi or switching to a different Wi-Fi network may resolve the issue.
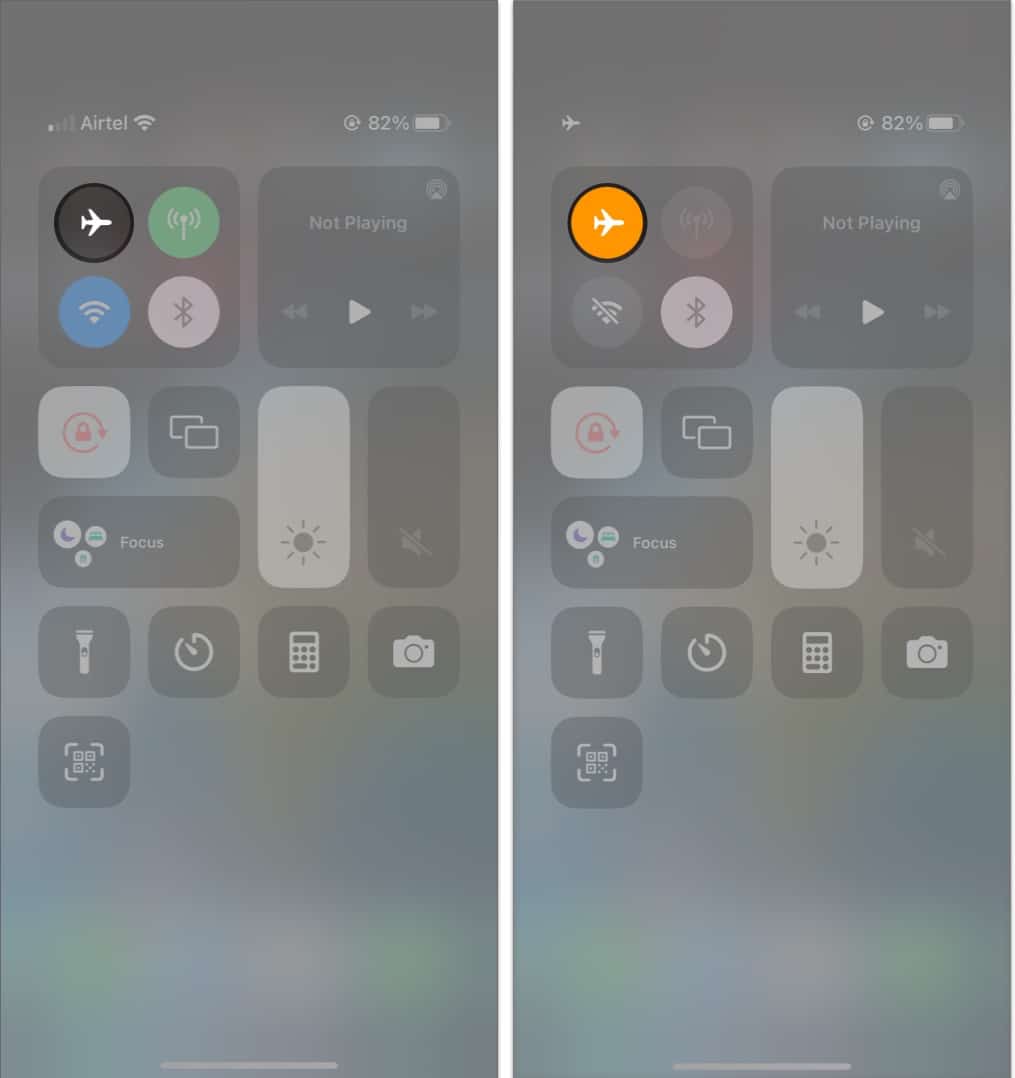
You might also try turning on and off airplane mode to restore the network connection.
- Open Control Center by swiping down from the top-right of your screen.
On Home Button iPhones, swipe up from the bottom. - Toggle on and off the Airplane icon.

If that doesn’t work, try resetting network settings. However, this removes all previous internet and VPN settings. So be sure it’s your internet messing with your phone before doing this.
- Go to Settings → General.
- Tap Transfer or Reset iPhone → Reset.
- Select Reset Network Settings.
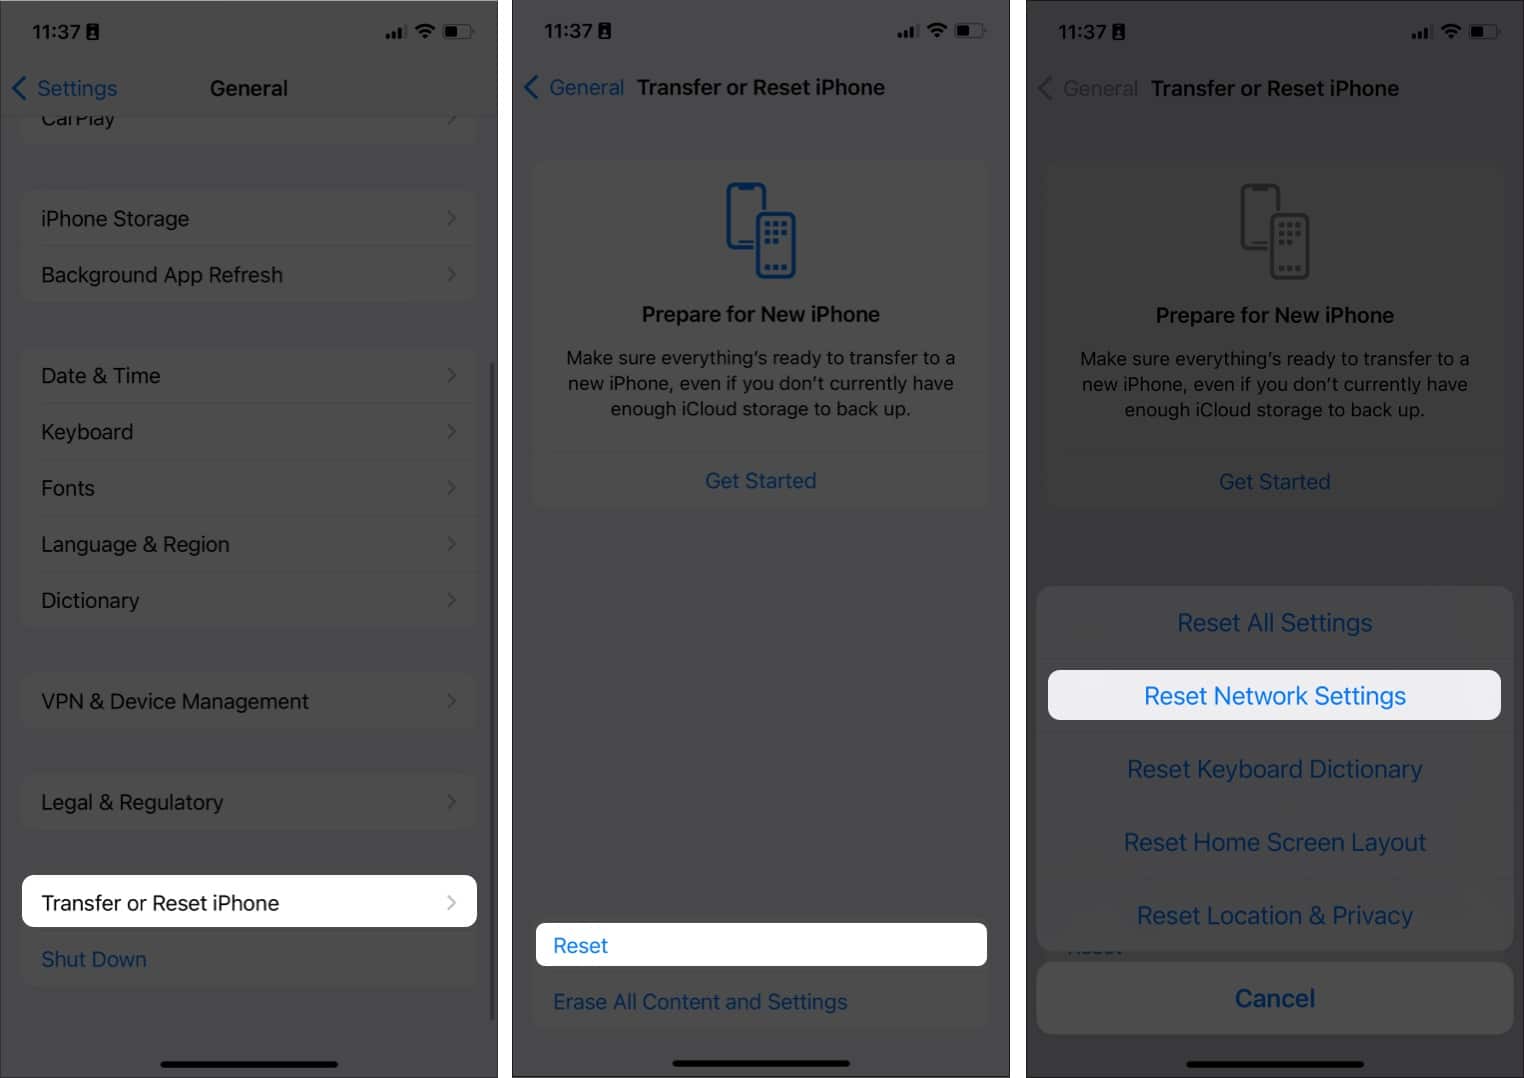
- Enter your passcode.
- Tap Reset Network Settings.

5. Update Apple ID information
Your Apple ID may have been linked to expired credit cards, debit cards, or other payment methods. So, you must update all necessary information on your Apple ID.
- Go to Settings → Tap your name.
- Select Payment & Shipping.
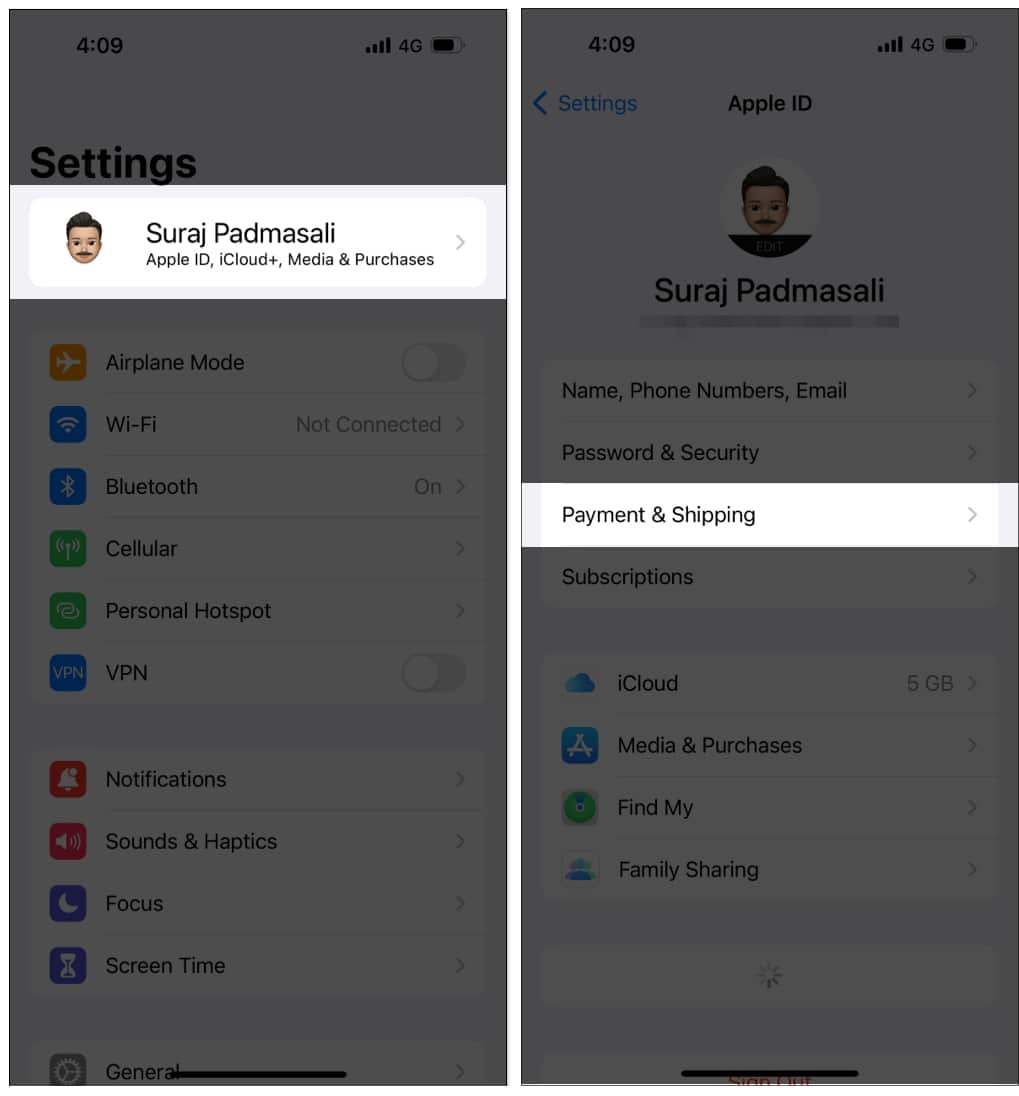
- Update the required information.

6. Reset Face ID or Touch ID
If the Apple ID settings update is stuck because of failed authentication, try resetting your Face or Touch ID. It may help remove the persistent notification. See our complete guide on resetting Face ID on the iPhone.
7. Reset your Apple ID password
Your old password may be causing a glitch and creating an Update Apple ID settings error loop. So, try resetting it. Go through our guide to learn how to reset your Apple ID password.
Some apps require your Apple ID for authentication. So, update your Apple ID details on these apps too.
8. Check Apple Server Status
Apple’s server might be down. That’s not new. So your iOS might hit a roadblock while trying to ping the Apple ID API, leading to the naive notification. You can check the Apple system status and confirm that the App Store, Apple ID, iCloud Account & Sign In all have green marks. Any color besides green signals server downtime or unavailability.
Tip: If you’ve confirmed that the Apple Server is available, at least before moving to the following solution, try contacting Apple Support to report the persistent notification.
9. Check for iOS updates
An outdated iOS can keep the “Update Apple ID Settings” notification popping. A simple way to troubleshoot and solve this problem is to check if your iOS has any pending updates..
Here are the steps to update your iPhone:
- Go to Settings → General.
- Tap Software Update.
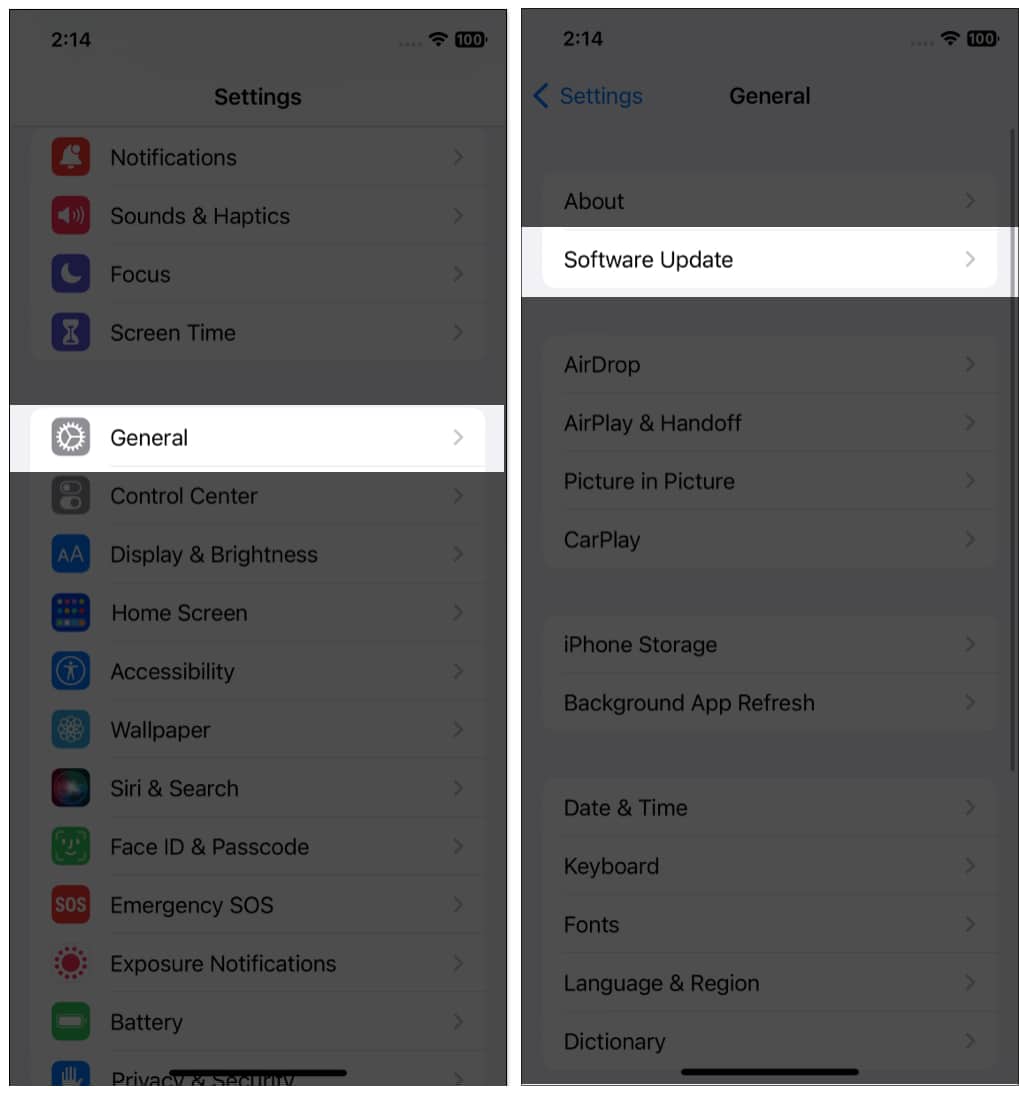
- Tap on Download and Install if an update is available.
Or hit Install Now if the update file is already downloaded.

10. Reset your iPhone
Resetting your iPhone should be the last resort, as it restores your iPhone’s settings to its factory default. However, keep in mind that you’ll lose files you didn’t back up after resetting your phone. So remember to back up your files before taking this action.
- Go to Settings → General.
- Tap Transfer or Reset iPhone → Reset.
- Select Reset All Settings.
- Then follow the onscreen prompt to reset your iPhone.
That’s all!
Incomplete software updates, inherent iOS bugs, and other uncontrollable underlying issues might cause this persistent “Update Apple ID Settings” error on your iPhone. But don’t worry; the above solutions are proven ways to fix it. Let me know in the comments which of the steps works for you.
Explore more…
- How to view and remove devices from Apple ID: 4 Ways explained
- How to fix Error Connecting to Apple ID Server message
- 11 Ways to secure your Apple ID on iPhone, iPad, and Mac
- How to fix “Cannot Verify Server Identity” error on iPhone
Explore this post with:


Idowu
Articles: 107
Related Posts


